All posts tagged: WIP

Sculpted Obliterator 2 - Flesh Painted

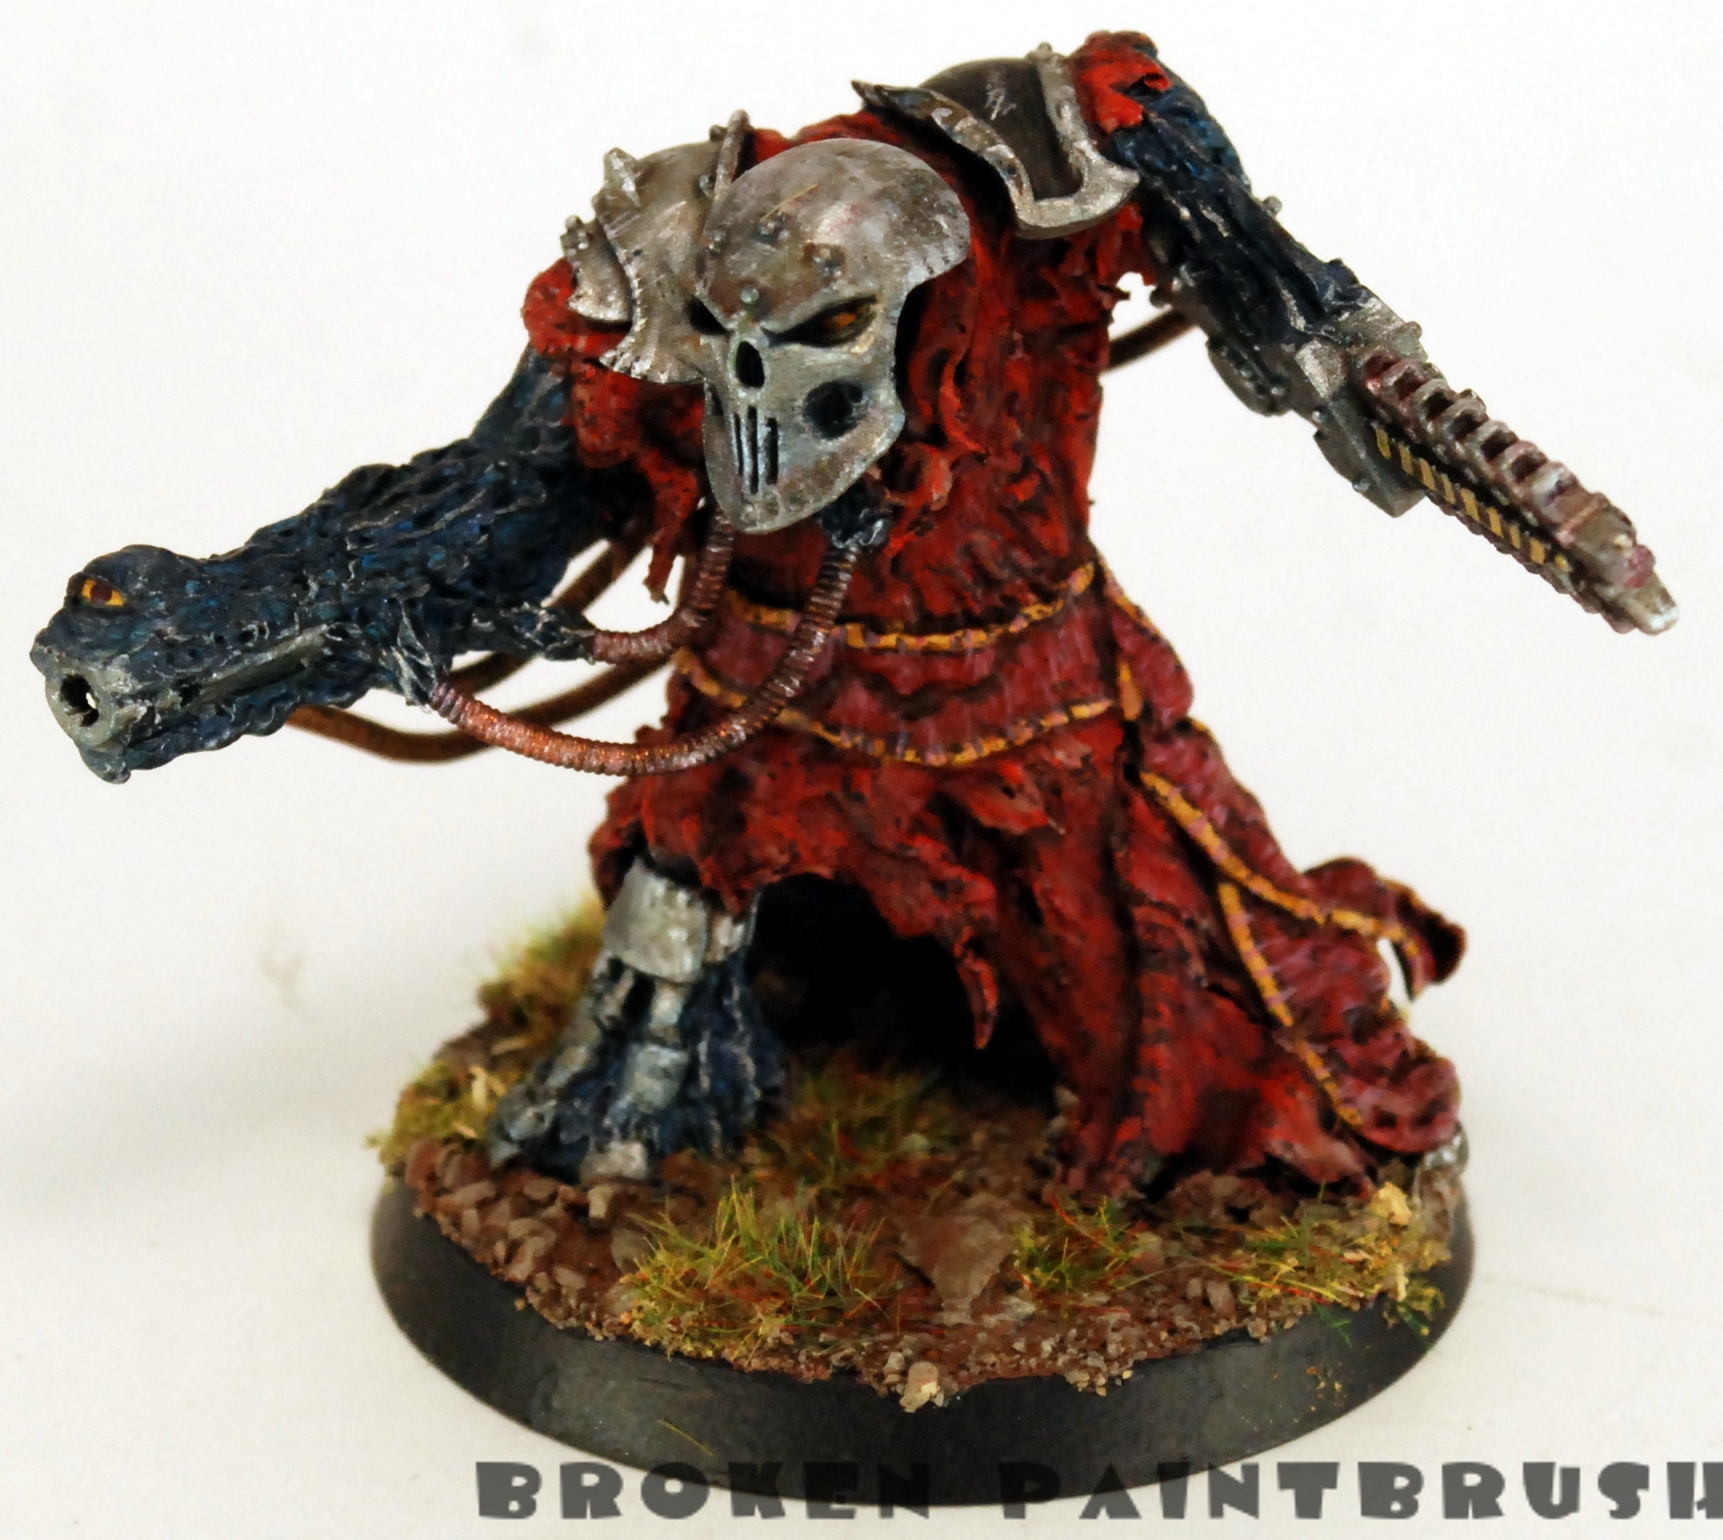
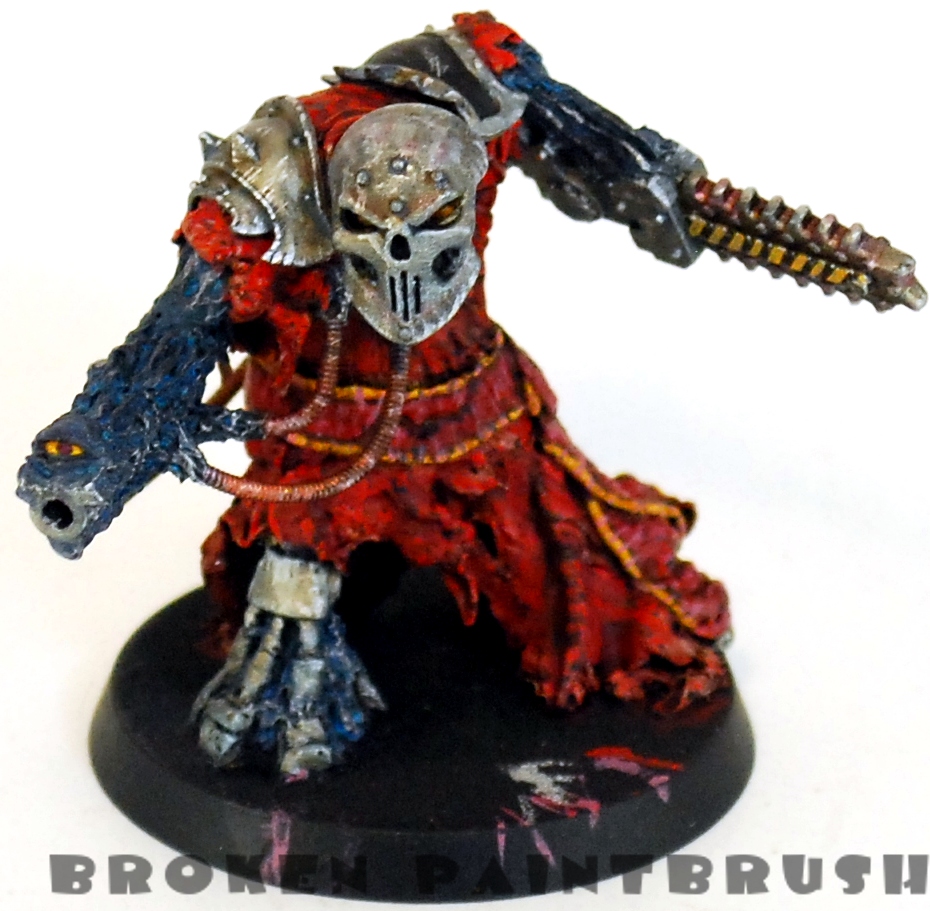
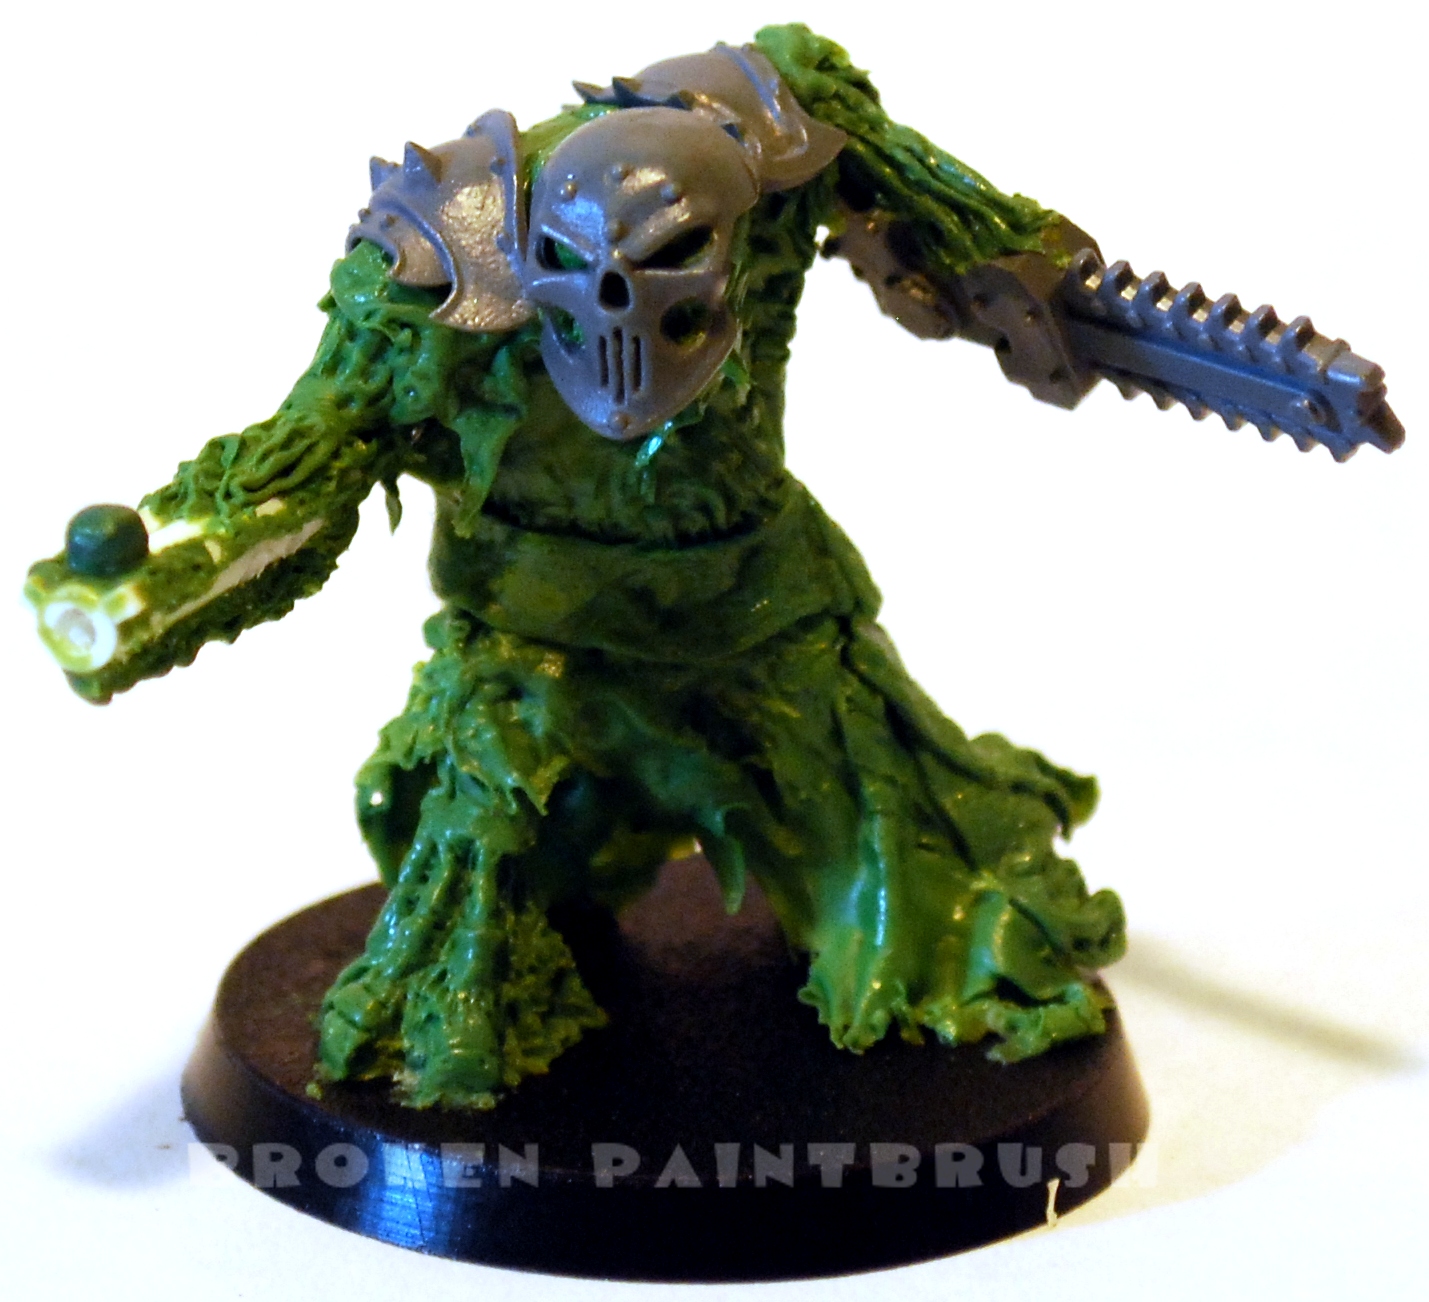
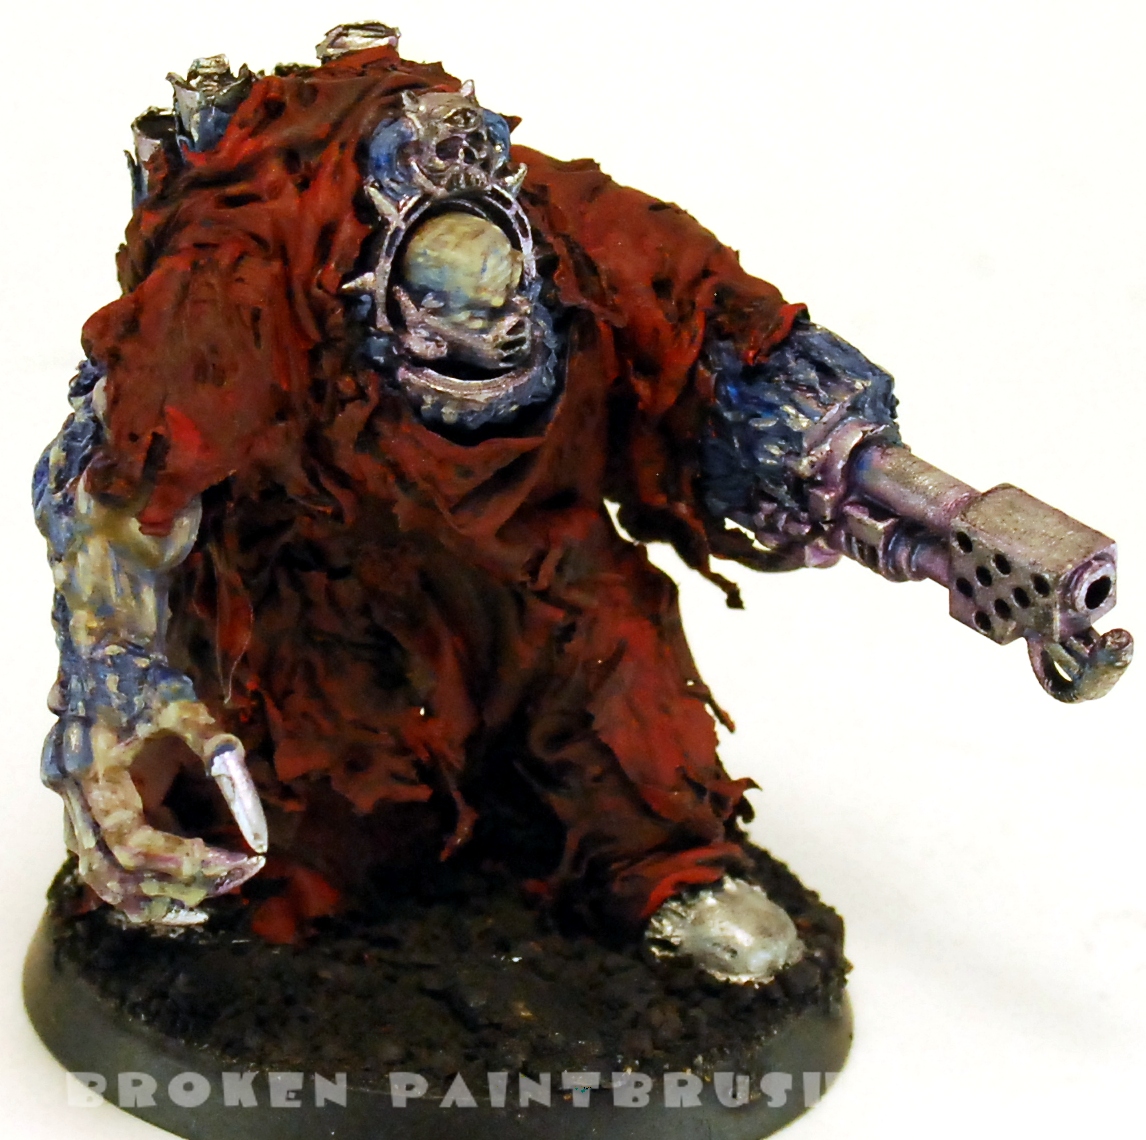
Second Sculpted Obliterator (2) – Painting has started

I was able to get some paint done on the second obliterator. It is amazing what a bit of primer can do for a sculpted piece… Next up was the base coat. This was mostly to block out the colors and give a base coat to the follow up colors. Ugly at this stage is ok… After a black wash to deepen the shadows I focussed on the flesh, both the daemonic as well as the human(ish). The skin was a mix of ice blue, space wolf gray, grave yard earth, and elf flesh. The blue was a mix of ice blue, space wolf gray and mordian blue. The blue was then highlighted with a mix of blue and mithril silver to blend it into the actual metal. Next up is the metal areas and then the robe. As always, comments and suggestions are appreciated.

Second Sculpted Obliterator - The Build Up - The Robe is Added - front

Second Sculpted Obliterator (1) – The Build Up

As promised, here is some build up shots of my second obliterator. One of the things I wanted to change on the second guy was adding more bulk to the body. I wanted it to look closer to a full terminator suit rather than a scarecrow with a robe. I started with bending a couple paper clips to create the wire-frame with proportions of a terminator, including the width and hight of the square body section. I added the arm bits and the head. The coper wire was used to hold different paper clips sections together. I then started to bulk up the wire with blobs of green stuff. I added in some bitz around the head from an extra terminator front (from the lord box I think). I also added some exhaust pipes to the back using some plastic tubes. The daemon claw hand was cut and bent to close it up a bit, gs was added to fill the gaps. After letting the first layer of green stuff dry more was added to the legs …

Sculpted Obliterator Final - front

My First Sculpt Pt 5: An Obliterator – Finished!

With some nice time off from work I was able to finish the Obliterator that I had sculpted. Paint wise there wasn’t much left to do, just some touch-ups and finish the base. The skull mast came from the defiler kit, the chain arm from the sentinels, and the shoulder plates from the marauders. I spent a lot of time trying to blend the organic, blue tissue into the metal by high lighting the flesh with silver tones and washing the metal with blue. I had also started the second obliterator a few days ago while waiting for some paint to dry. For Christmas my wonderful wife got me a package of Procreate Putty which I have to say is a fantastic alternative to green-stuff. The procreate is not nearly as sticky as green stuff is but adheres very well to the model. It is also stiffer than gs which made creating the robe much easier as I didn’t have to ‘paint’ super glue onto the end of the tatters to keep them in place. Here is …

WIP Sculpted Obliterator - part 4

My First Sculpt Pt 4: An Obliterator – Long Over Due Post

So it has been a while since I picked up the brush… well continuing on then. Did some more details on my Obilterator which brings him to a nearly finished state. I still need to finish the base and perhaps something more on the robe, but not yet sure what. I had thought about adding the XIV to the shoulder plate but remembered that oblits don’t have an allegiance and just fight for who ever pays them the best. Instead I opted for the yellow chevrons on the chain blade to tie in with the rest of my army. I was struggling with separating the sash and robe since they are supposed to both be red. I have tried using different temperatures of red along with the yellow border to separate them. The sash was highlighted and shaded with cooler shades of red, the highlight was almost more blue than red actually. The robe used warmer shades of red to highlight and shade. I’m not sure if I like how it turned out, but perhaps it is just that the robe doesn’t …

WIP Obliterator Sculpt 9 - Blue Painted

My First Sculpt Pt 3: An Obliterator – Base Coat Done

Spent some time painting the Obliterator. After priming it black, it is amazing how all the details (and mistakes) pop out. I then did the base coat of all the colors to block it out. Mechrite Red for the robes, Mithril Silver to the steel, Dwarven Bronze for the piping, and Ice Blue for the metallic flesh. The whole model was then washed with Devlan Mud.  The blue ended up looking nasty, dirty bubble gum, but thats ok since I will be repainting it anyway. Which I did next. I wanted to try a blue, lava-like texture that blends into the metal. Not sure of the result, it looks too shiny. Any ideas for fixing it? Next up is the red robe, which will the much more difficult piece to paint as I am hoping to do some freehand trim.

WIP Sculpted Obliterator - 4

My First Sculpt Pt 2: An Obliterator – sculpt nearly finished

Got some more work done on my Obliterator sculpt. I filled in more of the front foot by adding pistons to each of the toes. I also added the upper robe and shoulder blades from the Fantasy Chaos Knights box. The ball on the end of the gun will shortly become an eye ball. Also need to add the wiring from the arms to the back. I also photoshop’d the image to get an (rough) idea of what the coloring will look like. I’m not sure how I’m going to paint the flesh-metal but it will probably be a dark gray or purple, any ideas would be appreciated 😉

My First Scupt: An Obliterator – WIP – and why I had Green Stuff

So I’ve developed this habit: when I try something new, I go all out and skip to the hard stuff. See my Mentor Legion post when I wanted to try painting white armor. See my WIP (kinda dead-in-progress right now) Scratch built Titan. Well the newest thing I decided to ‘try out’ is sculpting. I’ve done some green stuff work to fill gaps and create some honor badges for my Iron Warrior Chosen, but I haven’t done any true sculpting.Well after scouring FTW, The Painting Corp, and Massive Voodoo for how to sculpt and digging through the Chaos Codex (all three editions), Horus Heresy: Collected Visions, and Iron Warrior for ideas I grabbed my tools and got to work. Below are some very rough WIP shots of the first Obliterator (eventually I will do three). Obviously, there is still plenty of work to do on the upper half, but eventually the robe will continue on his upper half, including a draping hood. The left arm (the one with the chain blade) is not attached so …

Mentor Legion Squad WIP – Part 5

Well I wasn’t able to finish the squad over the weekend, but I made some good progress. Until now I had been debating on how the Mentor Legion would show company/squad markings. They are a codex chapter but having different colored shoulder bands wouldn’t fit their look. I couldn’t find any thing scouring the interwebs so I decided on knee pads for the company color and Gothic numbering for the squad. This squad has been placed in the 2nd Company, 3rd Tactical Squad. This guy was my first attempt at free handing the tactical arrow and it turned out terrible! So I opted for the half-cheating approach. I used the transfers from the kit for the inner white arrow and repainted the red edging and then repainted the white inner area. I used the transfers on the other tactical arrows as well with an over-paint to cover the decal. I tried using the same technique for the Gothic number 3 but the decal was way too big for the curved surface and kept bulging. After trying to …

Mentor Legion Squad WIP – Part 4

Well I was finally able to get all the white done on this small squad. I think the last two guys got a little rushed in my anxiousness to get them done, but overall they seem to match up pretty well. Now with the white done there is little left to do other than details: the aquilas, purity seals, squad markings, and the bases. Hopefully I can get these done over the weekend. I also tried a couple different background for the photo shoot as white models on a white background don’t work all that well. For both of these shots I grabbed a nearby t-shirt and crumpled it up as the backdrop. Tan backdrop: Dark brown backdrop: What do you guys think about the different backgrounds? I am also going to try out a dark, textured paper somewhat like what Massive Voodoo uses. [amazonify]B000NH42Y0[/amazonify]

Mentor Legion Squad WIP – Part 3

So the white armor is takes a while to do… After painting this guy’s base coat I realized that to take full advantage of the paint mix I needed to complete him before moving on. I think his armor looks smoother than the Sargent but doesn’t show the same depth and shading. win some, lose some yeah? Anyway the steps I used to paint the white. I started with mixing 1:1:1:5 mix of graveyard earth, codex grey, skull white and water. I used this to pretty much cover everything except the recesses in the armor or where it met other colors. I then added more and more white and water and added about 6 or so layers focusing more on the ridges and ‘tops’ of the white areas. I finally used pure skull white to highlight the hard, upper edges. Here’s a shot of my messy desk area. In the background you can see some Iron Warrior Terminators awaiting finishing touches on their bases. Center back is my really basic ‘light box’ to take WIP shots …

Mentor Legion Squad WIP – Part 2

Although I was hoping to get some feedback on my first cut at my Mentor Legion Squad before continuing I decided to press on and finish the squad. As I picked up my paintbrush I realized that this was the first time I had done any painting for nearly 3 months! And man could I tell, my hands were somewhat shaky, the paint wasn’t smooth and my hands kept cramping up. After a few sessions I was able to get some good progress on the squad and regain some of the painting mojo. I almost didn’t post this next picture as it looks like a elementary school kid slapped the some paint on so that they could be played in a store… ugh. But oh well, here is some WIP shots of the squad: Here I blocked out the different colors to both get an idea of what goes where, as well as cover up all the white primer in all the little nooks without worrying about getting paint where it doesn’t belong. Colors are pretty simple: …