Latest Posts

Rainbow Warriors Tactical Squad Showcase

Rainbow Warriors Tactical Squad Showcase and Paint List

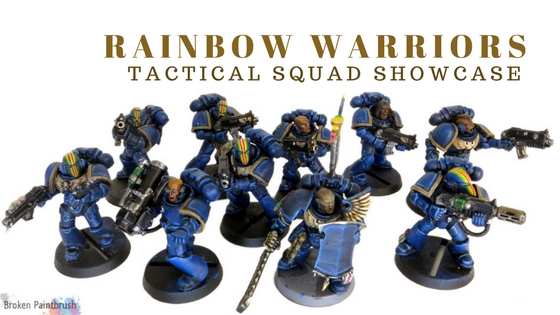
This weekend I completed the Rainbow Warriors Tactical Squad for the charity raffle and am happy with how they turned out. And really happy I’m not painting a whole army of them.

Rainbow Warriors Tactical Squad Showcase

For those who haven’t heard anything about the #RainbowWarriorsProject yet, it is a new charity raffle a group of us started up on Twitter. The idea and funds are directed to supporting diversity and inclusion within the gaming community.

Out of a discussion on this topic, the idea to paint the Rainbow Warriors, a Chapter based on the Mayan and Aztec cultures, was born. I jumped in and volunteered a tactical squad; others donated kits, others time to paint.

The finished models are then being sent to Dan (@TheLonelyHavocs) who is painting the bases donated by Dragon Forge and applying decals from Fallout Hobbies. Details are still in the works for purchasing tickets and all that, but check out the signup page at RainbowWarriorsProject.com.

Building on a Theme

To build upon the Aztec theme, where better to grab bits than from the Lizardmen Seraphon. While most of the bits are over-the-top, I found a couple that worked nicely for the sergeant. I also scavenged my bits bin for other nifty touches.

A shoulder pad with feathers from the Dark Angles, a storm shield from the Space Wolves, a winged shoulder crest from the Blood Angles, and a cool head from the Death Watch. Yeah, I have a bits problem.

Rainbow Warriors Tactical Sergeant

Some cleanup later, and I have a characterful, but not overboard Rainbow Warriors Sarge.

The rest of the squad received a few special bits here and there but kept fairly minimal. I did use more beakie helmets to harken back to their Rogue Trader days.

I also used more bare heads than I would normally do. In part, because painting that rainbow was going to be hard work (it was) and second to emphasize the diversity of the army.

Later, there was a call out for adding an Ancient (the new Company Banner Bearer) to the army. I happened to have an extra banner in my bits box as well as an old metal Master of the Arsenal.

Rainbow Warriors Company Battle Barer

The banner top was built from the Coldone Riders standard. I had lost/used the arm for the banner pole, so I built a new one from brass rod. At the local hobby shop, they had 1/16″ rod which fit perfect, and 1/32″ piano wire that slid into the rod. This gave the rod extra strength as well as provided the pin for holding the Lizardmen bit.

The Ancient is off to Chris, who also painted the Librarian, to paint up.

Rainbow Warriors Tactical Squad Showcase

I listed out the paint recipe created by Scott (@ryglore) but painting the Rainbow Warriors tactical squad was fairly straight forward – well other than the rainbow.

Completed Rainbow Warriors Tac Squad

While they do look a bit naked without finished bases and decals, the bases from Dragon Forge look sweet. Really looking forward to Dan finishing them off.

Rainbow Warriors Tactical Squad top

Since the Sergeant didn’t have a helmet to paint, I added some color to his back banner and feathers. I looked up pictures of South American parrots like the Scarlet Macaw, who have brilliantly colorful feathers.

Rainbow Warriors Sergeant with Power Weapon and Storm Shield

To give the back banner a painted-stone look, I dry brushed Steel Legion Drab and then Ratharth Flesh over the colors.

Paint List

Here is the paint list that Scott put together, so we create a consistent look across the diverse set of painters on the project. Since I had switch away from Games Workshop paints awhile ago, there were a few I needed to pick up, but it helped that we could all talk the same colors.

  • Blue: Kantor Blue -> Nuln Oil -> Caldor Sky -> Lothern Blue
  • Chest Crest: Ratharth Flesh -> Seraphim Sepia -> Ushabti Bone -> White Scar
  • Shoulder Rims: Steel Legion Drab -> Agrax Earthshade -> Rakarth Flesh
  • Eye Lenses: Caliban Green -> Warpstone Glow -> Moot Green
  • Rainbow:
    • Caliban Green -> Warpstone Glow
    • Yriel Yellow -> Flash Gitz Yellow
    • Khorne Red -> Evil Sunz Scarlet
    • Ushabti Bone
    • Order: green | yellow | red | bone | red | yellow | green

The rainbow on the helmets was a time-consuming experiment in patience. I started by painting the white stripe down the middle to center the stripe. I then painted each band as neatly as possible before going back with the highlight colors. It’s not often I break out the 00 size brush, but this called for it.

Get Involved

As I mentioned above, this army will be up for raffle, with the proceeds supporting diversity inclusion within the gaming and hobby community. With the talented pool of hobbyists working on the project, this will be something you will want to keep an eye on.

You can do just that by signing up at the temporary landing page: RainbowWarriorsProject.com. It’s a rough page right now, but we will be adding pictures of the finished units and how you can participate over time. Signing up for the email updates will keep you informed.

Painting the Pox Walkers with Washes

Painting Pox Walkers with Washes Tutorial and Showcase

Yes, I jumped on the new 40k box set. I didn’t fully plan on doing so, but I broke down, and I am glad I did. These new models are incredibly detailed and full of character. The zombies were the first to get paint and here is the tutorial on painting pox walkers with washes.

Painting Pox Walkers with Washes

I decided to use washes on the Pox Walkers as I wanted to get all 20 of them finished quickly and experimented with the style. When done well, you can get a great looking unit with a few different glazes of color.

Priming and Prep

After assembling the miniatures, I took some of the duplicates and modified them as you will see below. On some, I removed horns and extra equipment. On others, I bent arms and hands to get a different look.

Each model got a solid coverage of white primer using two light coats. For painting with washes, others have recommended using gray primer and give it a quick spray of white from the top. This can help add extra shadows to the underside of the model.

You will also notice through the pictures that I had glued the minis to empty bases as I wasn’t sure what I was going to do yet. I later picked up a set of the Games Workshop Imperial Sector bases for the kit. More on that later.

Base Colors and Brown Wash

I credit my learning on painting with washes to Greg (greggles) and his technique for painting Orks. One modification I made was painting the metallic areas first – pretty much the only standard paint on them.

In Greg’s flow, he paints the metals last, which means if the paint gets on something it shouldn’t, it is a pain to clean up. Painting them first provides the ability to clean up as everything else is just white primer. The downside is that the metals are a bit messier and darker.

Painting Pox Walkers with Washes the base colors

Afterward, I gave the whole model a good wash of dark brown. I thinned it down a bit with Airbrush Medium and Flow-Aid. The mediums prevent much of the pooling that can happen with washes. The dark brown provides an excellent base color to work off of while creating most of the work for the bones and leather.

Colors:

  • Brass: WarColours Metallic Copper (Warplock Bronze)
  • Iron: Vallejo Game Colors Gunmetal (Leadbelcher)
  • Brown Wash: Vallejo Dark Brown Wash (Agrax Earthshade)

Adding Color

Here comes the fun part, adding a riot of colors to make these guys fun and disgusting. I didn’t take a lot of pictures during this stage as I was sitting on the couch painting them up.

The different colors were used to provide coloring on the clothing as well as the mutations. This allowed for each mini to be colorful but some amount of uniformity of colors.

Adding Color to the Pox Walkers through Washes

Most of the clothing was kept the previous brown wash, red, or yellow. This allowed some variation without going crazy. Some of the details like belts and boots were washed with black.

The skin had variations of yellow, flesh wash, green, and additional brown layers. I added more colors to the puss and boils, including some turquoise, purple and green.

Colors:

  • Yellow: Games Workshop Casandora Wash
  • Green: Vallejo Dark Green Wash (Athonian Camoshade)
  • Flesh: Game Color Flesh Wash (Reikland Fleshshade)
  • Red: Game Color Red Wash (Carroburg Crimson)
  • Blue: Game Color Blue Wash (Guilliman Blue)
  • Turquoise: WarColours Turquoise Transparent (Nihilakh Oxide)

More Color

Below you can see the gallery of each set of minis in the set which highlights some of the changes I made to the figures. The color variation also created separation between the duplicates as well.

The next stage added even more color, especially through some fluorescent paints from WarColours. I used the pink on the maggots and green for all the exposed insides. I also added some additional color washes to parts of each mini and rust spots with bright orange.

For some of the bones and teeth, I did go back with Bonewhite to brighten it back up. I also added some blacklining with a black wash to add some definition where colors were blurring the details.

Colors

  • Bright Green: WarColours Fluorescent Green (Nurgle’s Rot)
  • Bright Pink: WarColours Fluorescent Pink (Emperor’s Children-ish)
  • Purple: WarColours Transparent Violet (Druchii Violet)
  • Rust: Game Colors Orange Fire (Ryza Rust)

Painting the Bases

One of the hopes I have once I finish painting the models in Dark Imperium is to get them featured in White Dwarf. So to that end, I couldn’t use any of the resin bases I have been collecting from Secret Weapon. I instead picked up some of the Sector Imperialis bases from GW.

Painting the Sector Imperialis Bases

While not nearly as detailed as the resin bases, they still provide a nice thematic look to the army. It will also go nicely with the city board I am building.

To paint the bases, I left them all on the sprues and primed them with gray. All the silver and brass areas were painted as above. Layers of washes were then applied with some additional dry brushing.

  • Concrete: black wash then dry brushed gray
  • Metal: green and brown washes then some orange rust
  • Brass: turquoise and brown wash, then some touchup with brass
  • Skulls: Bonewhite then brown wash then more bonewhite
  • Dirt: brown wash then dry brushed Bonewhite

Finished Unit Showcase

With the bases done, I removed them from the plain base. Tip for the future: use super glue. It snaps off nicely.

Painted Pox Walkers with Washes

As you can see, they are a great riot of color, and yet look like a unit. The pops of color add some interest throughout the mob. But I am well aware that each mini has lots of rough spots be it paint splatter, puddles, or missed details. I am fine with this as they are meant for tabletop, deployed as a mob.

Pox Walkers from Dark Imperium

The bases look cool all together as well. It adds some interest and setting, without distracting from the actual miniature.

Up Next

As I previously showed in my last WIP post, I have started the Chaos Space Marine unit, painted for my Iron Warriors. But before I get those done, I need to finish the tactical squad of Rainbow Warriors and get them out for the charity raffle.

Caught up in the #New40k Hype Train

Yes, I got swept into the massive hype of #New40k (can you blame me?). Between building the minis from the Dark Imperium box and a whole pile of Sector Imperialis buildings have kept me busy.

I think I have built more miniatures in the last few weeks than the previous six months. While it has affected my posting schedule here, and my writing goals for the next book, it has been a ton of fun getting caught up in the thrill of 8th Edition.

Gaming Table

I think I bought a set of Secret Weapon’s TableScapes two  years ago and they have been sitting in the box, languishing ever since. But with excitement of the new edition of 40k being easier than ever to get into, I decided to break them back out as well as the box of GW building kits.

While it is only a 4×4 set, it will be plenty big enough to get some games in at the house and I can expand upon it later.

Eight of the tiles are roadways, leaving the other eight to be filled in with the buildings and line-of-sight blocking features. I had two buildings made from the Pegasus Gothic set and a pile of sprues of GW’s buildings needing to be built.

I wanted to build up a set of tall buildings to allow for some vertical gaming and large line-of-sight blocking features. This is extra important in 8th edition as cover is overly simplified and shooting through ruins no longer provides cover.

Much of this height was provided by the Shine of the Aquila walls that came in the Relicos Militarum box I picked up a few years back. While a great deal in terms of the massive pile of plastic, I didn’t realize most of it is the Shrine set – which doesn’t go with the normal ruin kits very well.

Games Workshop Shrine of Aquila Building 1 WIP

The first ruin was mostly square to fill up most of the square tile as possible. The back half was mostly ruins though to allow access to the interior for gaming.

Games Workshop Shrine of Aquila Building 2 WIP

The second started off as a desire to add a recessed door, so two columns of the regular city walls were built on either side of the Aquila wall. Turns out, the kits aren’t really meant for this as the floor tiles won’t fit. For each floor, I needed to cut off about 1/8 inch to squeeze between the walls.

Games Workshop Shrine of Aquila Bell Tower WIP

The last building started off as a narrower building made just from the Aquila pieces and a separate box made from the remaining walls I had. Somewhere the idea to turn it into a bell tower popped into my mind. I had picked up the Skaven Doom Bell for bits.

It took some creative use of random bits to lift the bell high enough not to hit the flooring. Four sets of dozer blade pistons were cut up and then mounted on blocks of cork. I then added a thick layer of texture paint over the cork to make it look like concrete.

While I removed the main Skaven icon from the bell, I left all the smaller ones. I figured it would add an interesting backstory, especially games with the Inquisitor or Deathwatch squads.

The final piece as the shattered Aquila icon which I turned into a sort of park. Setting it an angle not only allowed it to fit, but it also broke the square flow of the tiles and buildings.

Two more tiles will hold the two Pegasus sets I already had built, leaving two empty tiles. I may leave these empty for more open playing areas, or build up more Pegasus kits (I still have a ton).

Pox Walkers

I didn’t plan to pick up the new Dark Imperium box as I really don’t need more models to build and paint. But between seeing all the beautiful work online and not having the rule book available at my FLGS, I rationalized the box by the great deal all those models are above the book that comes inside it… Yes, I have a plastic crack addiction.

I spent a few evenings building up the models while watching movies with the family. And I must say, these are some of the best single-pose kits I have ever built. There is so much variety and character in the minis, especially the chaos side, that it is easy to overlook the duplicates.

The first to undergo the brush were the Pox Walkers. I wanted to paint them quickly with washes and have an excuse to play with colors.

Dark Imperium Pox Walkers Painted with Washes

I’ll do another post focused on painting them later, but I did finish all 20 of them in fairly quick order. And since most of it was washes, I was able to sit on the couch with the family while doing them.

Pox Walker with Cyber Arm painted with washes

I still need to do their bases, but I am happy with how colorful, and yet zombie-like they came out.

Nurgle Iron Warriors

The next unit to get some paint was the Chaos Marines. The kit is supposed to be Death Guard vs. Ultramarines, but I really don’t want to start another army. So I figured these will be Nurgle-loving Iron Warriors instead.

Nurgle Iron Warrior WIP Step 5: Brown Wash

And for anyone painting gold trim: my new found favorite is Vallejo Game Color Glorious Gold. This went on super smooth and covered so well. I wish I had this went I painted my previous Iron Warriors as it would have saved so many headaches.

Work in progress on Nurgle Iron Warriors

At this point, the base colors are all finished and the Dark Brown Wash has been applied. This gets them to about 80% completed already. As they are Nurgley, I will go back and add more rust and verdigris to their armor and then highlight all the colors.

Rainbow Warriors

While progress has been slow on my part of the Rainbow Warriors Project, I have completed the first three tactical marines. For some reason, edge highlighting blue has been killing my motivation on them. So I took only three of the marines and brought them over the finish line.

Rainbow Warriors Tactical Marines

Painting that rainbow though! I can see why no one has done a full army of them. I didn’t do any blending for the colors, but it still took forever to get all the lines looking good and each band wide enough to be seen.

Rainbow Warriors Tac Marines - Back

Once I finish the squad, they will be shipped to Dan (@TheLonelyHavocs) who is doing the bases and decals. At some point there will be an announcement on how to buy tickets for the raffle, with proceeds going to a group championing diversity in gaming conventions.

Up Next

Once I finish the bases for the Pox Walkers, I will write up their painting guide with all the various, vibrant colors I used. I’ll do the same for the Nurgle Iron Warriors as it is slightly different than my normal process.

I also need to finish the other seven Rainbow Warriors this month and get them out, so they will probably happen before any of the other DI box. Though I did start the base colors for one of the Primarus Marines to be part of my Mentor Legion.

Traitor Guard 2k Tank List

Finally, I started writing some lists for each of my armies with the new index books. I really like the flexibility the new structure provides, like building an all tank Guard army. More on that to come.

Good Reads 54

Good Reads 54

Cutting into your feed of #New40k reviews and battle reports, Good Reads is here to highlight some of the awesome work by fellow hobbyists. These are some of the ones that caught my eye and well worth spending some extra time on this week.

Good Reads 54

The First Born

Vostroyan First Born command squad

First Born by The GunGrave

With all this #New40k going on, it is fun to see people breaking out their old armies again. Like these classic Vostroyans by The GunGrave. Unfortunately, he sold them off, but they are a lovely army to look at.

Sail Away Photos

Painted Sail Away Bust

Sail Away by Nils Hombergh

While not a full step-by-step tutorial, Nil’s post is a great view into how he painted this lovely bust of Sail Away. It is fun to see how other artists go about painting. You can see the finished gallery here as well.

Light Up Marines

Space Marines with LED effects and lenses

Marines by Bob Hunk

Rory has a knack for finding excellent hobbyists from the forums and getting them to showcase on his blog. This time it is Bob Hunk with some incredible light-up Marines. Not only is it cool to have the weapon and lens effects, but they are well-painted miniatures.

Spawn Some Color

Converted Chaos Spawn from Crypt Flayers

Converted Spawn by Thor

Thor isn’t afraid of adding some color to his Chaos force, and this squad of converted Spawn highlights the variety. That and the use of Crypt Flayers make for a unique look.

Brand New [Kitbashed] Landskimmer

Kitbashed Space Marine Landskimmer

Kitbashed Skimmer by bjorndovah

Could this be the hinted Primaris flyer? Nope, Bjorndovah had too many bits laying about and decided to put his imagination to work on a prototype Space Marine Landskimmer. Over the top? Yup, but all part of his creative plan. (besides have you seen the new Primaris tank?)

A Mouse of an Aventure

Lara Kraft mousling

Lara Kraft painted by Scott Ferguson

Not only has Scott been on a Chibi kick, but he is also judging at GenCon for the Golden Kobold. This mousling Lara Kraft is a great example of Scott’s great work and how fun these models can be.

Good Reads 54 Wrap UP

I hope you enjoyed this week’s selection of Good Reads. I know that I have fallen behind in keeping up with most of the blogs on my feed, so if you think I missed something, hit up the comments below. I would love to hear about it!

A Look at Sticky Tack and its use in the hobby

Cool Tool: Sticky Tack – and it’s many uses for hobby work

Ready for a Cool Tool I think you should have on your hobby desk? Expecting something big and fancy? How about something simple like sticky tack! Yup, I want to highlight the different ways you can use it for your hobby.

A Look at Sticky Tack and its use in the hobby

OK, while not the coolest thing on my desk at the moment, I have found that sticky tack (silly putty, Blu-Tack, poster putty, etc., ) is a must have. Below I listed a few tricks that I use or have seen other hobbyists use.

Holding minis while painting

The most common way I use sticky tack is to create a handle while I paint the miniature. This not only makes it easier to hold the model while painti but also prevents me from rubbing off layers of paint with sweaty hands.

Using sticky tack and a cork to hold a miniature for painting

I found that corks from whiskey bottles make great handles and a big blog of sticky tack holds the miniature in place. One of the benefits (as compared to glue) is that it works on odd surfaces like the banner here.

Holding Still While Priming

Ever go to prime a mini, only to have the spray can send them flying away? Add some sticky tack to hold them to a piece of wood or spray stick. Not only will this hold them in place against the spray, but you can also tip the stick around to get the odd angles.

Sticky Putty Mask For Airbrushing

While not my area of expertise, I did find two tutorials here on using sticky tack for airbrush work. The idea is that the putty is sticky enough to hold to the miniature, but not so much it will tear the paint. It is also pliable so you can shape it around details and textures.

Using Sticky Tack for Tank Camouflage

Sticky Tack Camo by Cameron from Rust and the City

Cameron used multiple layers of sticky tack for the camo pattern on this tank. By spraying the whole model with the first color, stripes of sticky tack hide it during subsequent sprays. Adding additional layers of sticky tack allow for additional layers of paint.

Masking with Blu-Tack for airbrush work

Using Blu-Tack for airbrushing by Arbal on Coloured Dust

In this tutorial by Arbal, not only is Blu-Tack used but a bunch of other masking materials for airbrushing. The Blu-Tack was used to cover the face of this Spartan King.

Masking Glue Joints with Sticky Putty

Another masking trick for sticky tack is to cover bare plastic while painting the miniature.

Using Sticky Tack to Mask glue joints

Dreadnought WIP by Dave Mary of 262nd Death Korps

This tip came from Dave Mary during last year’s Dreatober event. He uses sticky tack to cover the glue joints when painting a miniature in parts. This way plastic glue will hold everything together nicely when he has finished painting.

Mocking up Kitbashes

When kitbashing, it can be difficult to see what the end model may look like with the various bits gathered.

WIP INQ28 Techno-Barbarian Conversion

So use a bit of sticky tack to hold each bit in place. It won’t fit perfectly and will droop as you fiddle with the mini, but it can give a good sense of scale and balance.

Propping Joints While Gluing

Plastic glue is great for creating a strong bond between parts, but it can also take a while to cure. If you have every held parts together, waiting for the glue to dry, only to have them fall back apart, you know the pain.

But add a bit of sticky tack, either over the parts or as a prop holding them up, can give you the extra support it needs.

Wrap Up

Still doubt the power of sticky tack? Perhaps you should pick up a pack next time you are out. It’s only a few bucks (this one is $3 on Amazon) and goes a long ways.

Have more tricks with sticky tack aka silly putty? Leave them in the comments below so we can all learn a few more uses for this magic substance.

Blogging and the Honest Truth About Running Ads

The topic of ads is one I always find interesting. There seems to be a fair bit of negative stigma attached sites that run ads, and that’s what I wanted to discuss today. I wanted to clear the air on the subject and explain it from the perspective of the blogger, or website owner.

Thor from Creative Twilight is back with more insight on hobby blogging. To check out more tips on improving your blog, check out the page here.

I tend to use blog and website interchangeably when writing. For the sake of discussion, I mean no difference between them.

Bad Ad Setups

Ever been to a site that ran like eight different ads all over their site, plus one that floats at the bottom, and often a pop-up when you leave, or a pop-under as you’re visiting?

Hell yes you have; we all have.

Those sites are often so slowed down by the amount of ads they are delivering that you give up on reading what you went there for, and you just bail out to never return. Sometimes it’s on a website you enjoy, despite the metric-ton of ads, so you install an ad blocker. That way you can visit the site and not get bombarded with ads.

Ads

Some websites feel like this.

While, as you’ll see below, I’m a proponent of running ads on a site, there’s a line that many sites cross in their pursuit of monetization. It’s the old adage of “If one is good, two is better!”, but multiplied by 5 or 6.

If done well, ads should be integrated into the site such that they do not interrupt the user’s experience. A slow loading site because of too many ads is indeed interrupting the user experience. Ultimately these sites are hurting themselves because they are missing out on traffic as people leave the site in frustration.

Suffice to say that a lot of sites don’t do ads well.

Good Ad Setups

As I said above, a good setup with ads will be a relatively seamless thing. The ads should blend in, while still being noticeable – a contradiction I know! You should be able to read the article you came for without being disturbed by ads.

There are a lot of principles on good ad setups, but since that’s not the goal of this article, we’ll leave it at that.

Why Blogs Run Ads

This is where the misconception comes in with ads. While some people run blogs with the sole intention of making money, of getting rich – or at least making a living, that’s not why most of us do it. So, why run the ads then? Let me explain.

Since you’re reading this article, it’s safe to assume you’re a hobbyist and/or gamer, so am I. I had started my blog Creative Twilight as a way to promote commission painting I was doing at the time. I eventually burned out on commission painting, but I kept the site and began blogging about Warhammer 40K. Eight years later, here I am, still blogging about 40K.

Over the years I have had to pay for my blog. At first, I was hosting in a shared environment, which was affordable, but not great when your site starts getting more traffic. I had to upgrade to a VPS (virtual private server) so that I could run Creative Twilight, and the other sites I have. Eventually, I had to upgrade the VPS package too as the traffic kept on coming, and I had to keep the site working optimally.

Expenses

The reality of running a website.

I’m not mentioning that for the technicalities, but because – as you’d have expected, the hosting of my blog is not free. Every month I pay for the VPS I have to run my sites. I also have to register my domain name (URL) every year. Occasionally, I will run ads on Facebook. Facebook is a fickle beast. They really do force you to spend money to get any true value from them. The thing is, it’s often worth it if you can afford it.

So, I have expenses to run my blog, as I’m sure Joe does as well for this great blog you’re reading this article on. Long story short, I run ads to try to cover my expenses.

Time, Energy, and Value

There is another part to this though, the reason blogs will run ads, and one seldom mentioned.

If you have never blogged, then you may not be aware of the amount of time that can go into an article. One article can be hours and hours of work. If the article is a tutorial, then I can easily spend 6-10+ hours working on the article and taking pictures. I will later spend hours more promoting the article and trying to draw traffic to it.

A great article should have value to anyone who reads it. Many of us try to create resources and guides for the readers. We, the bloggers, are trying to create value in what we write. Not everything we do is a masterpiece, but now and then we will create something we’re very proud of.

Success

Having a successful blog is hard work.

Many of us have sites we frequent, and articles we have saved for reference. Whatever it is that draws you to a particular site, or article deserves to be rewarded, right? Between the time, energy, and hopefully value, of the articles that bloggers create, getting some recompense is not unwarranted. Basically, getting paid for your time.

I can’t speak for everyone else who blogs, but I know that I enjoy being rewarded for my efforts. In my case, and the case of many, those small financial gains we may get through ads are just being pumped right back into the site to cover expenses anyway.

We’re not getting rich, that’s for sure. However, it does help keep us around to continue creating the content you enjoy consuming.

Ad Blockers

Now, we dive into the meat of the matter, ad blockers.

Hopefully, I have helped you understand why some of us run ads on our blogs, and those reasons sound rational to you. See, people who run ad blockers are hurting smaller sites like mine, or Joe’s (though he doesn’t run ads) where we’re trying to cover expenses. I get if you’re visiting some big and nasty site that optimizes ad abuse. However, consider adding exceptions to your blockers for the smaller sites you enjoy. That $1 a day a blogger makes on ads can honestly be the difference between their site being there one day, and gone the next.

Ad Blockers

In Conclusion

I get that ads can be annoying, I really do. Try to understand where the blogger is coming from who is running the ads though. I can honestly say that I would rather not run ads on my blog, but I have little choice in the matter. I’ve tried other monetization strategies, and so far none have come close to matching what ads do.

Joe is working on a book, which is an awesome way to monetize a site without running ads. Maybe someday I’ll find a similar technique.

Until then, I, and many others will run ads on our site in hopes of covering expenses, and maybe put a few dollars in our pockets for our hard work. Hopefully, you understand and don’t think poorly of us for doing so.

Editor’s note: thank you Thor for being so honest and open here about running ads on your site! While Thor mentioned that I am currently exploring other options to pay for the work I do here, the expenses of running a site can add up. I hadn’t thought about unblocking sites that I want to support, such as fellow hobby bloggers, and I hope you can do the same. Putting up with an add here and there (and Thor’s site does fall into the well done side) is free for you, and helps the blogger keep the lights on.

If you have any thoughts or input on running ads on your site, or others, leave a comment below.

To Our Hobby Fathers

In Honor of Hobby Fathers, Happy Fathers Day

On this Fathers Day, I want to thank all the hobby fathers who may have brought you into the hobby, much as mine did. Also a shoutout to all the fathers out there passing on the love of building and painting miniatures to the next generation.

To Our Hobby Fathers

My very first experience with miniatures was receiving a Snap-Fit, translucent green race car for my fifth birthday. I have no clue what car it was, or where it may be now. But it started my path down the hobby.

My Hobby Father

I think I got a few other kits over the following years, but the one that I remember the most fondly is the F-14 Tomcat. It wasn’t the plane that was so memorable, but the time I spent with my dad as he taught me how to paint it.

F15 Tomcat painted with my dad

But the thing was, my dad wasn’t a hobbyist himself, at least in scale models. I’m not even sure where he learned the techniques to help me paint the Tomcat.

What he did do, though, was encourage and inspire me to try new things. When my brother and I wanted to build a model railroad table, he showed us how to frame it and use his tools. If we screwed up the paint job on one of the hot rod kits we got, he would give us suggestions on how to fix it.

So while my father wasn’t the reason I got into wargaming, he was instrumental in where I am today in the hobby.

The Next Generation

Now I’m looking at being able to lead the next generation of hobbyists to learn and improve. While my sons are not yet old enough, I try and do my part to encourage them with art. My oldest and I have even painted canvases together on the back patio.

Painting with my son

It is tough as an experienced painter to watch him mix all the colors together, slop the brush around, and ram the bristles into the water cup. But it is also fun to see him experiment without constraint.

As he gets older and can focus, it will be fun to teach him our hobby and the game. But it will also be interesting to see where his focus may lead him, which may, in turn, teach me new things.

Thank You

So I wrap up this semi-rambling post reminiscing about my childhood and dreaming of my son’s future, to say thank you to all the hobby fathers out there. This generous and welcoming hobby is full of amazing people, in part because of the fathers who encouraged us along the way.

Book Released! Learn How to Build Miniatures and Improve Your Skills

Technically, my book, How to Improve Your Hobby Building Skills, was released on Kindle June 3rd, but now it is available as a paperback as well! If you wanted to learn more about the book, or how you can help, this post is for you.

When I was writing the series on How to Improve Your Hobby Skills, I kept trying to balance between going too deep, and thus blowing up the size of a blog post, and covering enough details to make it helpful. This spawned the idea that I could take each part (building, painting, showcasing) and expand it into a full-sized book.

It’s a crazy idea for a guy who struggled in English class! But the more I dug into what it would take to self-publish a book and all the tools to get it done, the more excited I got.

What is in This Book?

When I started writing this book about building miniatures, I started with thinking about what are the things hobbyists struggle with. Many of these ideas came straight from you, my readers as you sent me emails or left comments, I have been listening.

I also thought about the most basic topics that many of us now take for granted, but someone just getting into the hobby might not understand. You can see this in the first section of the book where I cover building your first miniature, tips for using the tools safely, what the most basic tools are, and what glues are what.

An example page showing how to build your first mini

The second part of the book goes further in depth on how to build miniatures, including how to prepare each bit (wash and mold lines), bit bashing, filling gaps, base options, and how planning out projects.

Example Page showing conversion work

The last section gets into more advanced techniques to help hobbyists start to explore where this hobby could take you. From basic sculpting, and converting bits, to understanding composition within the pose.

How You Can Help

Want to help support Broken Paintbrush and my effort to write more books? I’ve got three different ways you could help:

  1. Buy it! That would be swell 🙂 I’ve been able to publish the book on a ton of different platforms, and the link, books2read.com/hobby-building-skills will show the full list. Currently, the paperback is only available through Amazon.
  2. Review it! If you did buy a copy, I would love a positive review on the site you bought it on. Getting reviews, especially 4 or 5-star reviews, really helps others find the book and decide to pick it up themselves.
  3. Share it! Thanks to the timing of #New40k, I completely understand that many of you are a bit low on the hobby funds. So while I hope that you can save the book to your wish list, I could also use your help to spread the word. You could click the share widgets on this page, or point people to the book page at: brokenpaintbrush.com/books/improve-hobby-building-skills

I also want to give a huge shout out to Rory from Stepping Between Games for reviewing the drafts and giving a ton of helpful comments. Thor from Creative Twilight and Adam from Sprue Grey also provided some great feedback.

Also, thank you, my readers and fellow hobbyists. This great community has helped support me from a fledgling blogger years ago, to being building the courage to write a full book.

How to Paint the Blood Bowl Troll

How to Paint the Blood Bowl Troll – A Broken Paintbrush Tutorial

I started painting the Blood Bowl Troll as a way to show different painting techniques but found it was going to work better as a general tutorial instead. Check out the tutorial below for tips on how to paint the Troll as well as some general tips on painting with washes and blending.

How to Paint the Blood Bowl Troll

Orc and Goblin teams can take the Troll for some extra muscle and even toss a (somewhat) willing volunteer across the field. As I build up each of my Blood Bowl teams, I want to add some of the special team players to add some fun to the games. I had fun painting him to a higher standard than the Orc players and testing a few techniques.

Building and Prep

This model was probably the craziest I have done regarding odd pieces for a single character model. This does create a pose that is detailed and dynamic but provides only a single pose. For those who like to leave pieces separate, the only one part that made sense was the shoulder pad. The left arm would have been the most helpful but would have been a pain to re-join later.

Because this is a new mold, there was hardly any mold lines, and most of the glue joints were cleverly done along easy-to-hide lines.There was a good deal of Liquid Green Stuff work along the seams though.

Priming and Base Coat

Priming the Blood Bowl Troll WhiteI started by priming the troll white, primarily so that I could later use washes to paint his skin. A zenithal prime would have provided better shading as you prime the model black/gray and then white from a high angle. But the white made it easier for clean up as you will see in a moment.

I started with my typical rattle can white primer, but once it dried, I also brushed on Vallejo’s white primer. This provided a way to color match when I needed to do some cleanup.

Brushing on the primer also filled in the areas where the spray didn’t get to. There are so many overlapping parts on this figure that brush priming was needed just to get good coverage.

Blocking in the base colors on the Troll

As typical with my style of painting, I blocked in all the main colors, except the skin this time. Painting all the base colors makes it easy to see where everything goes and is easy to touch up areas that I accidentally hit with paint. And since this Troll is awkward with that hand, there were plenty of mistakes.

Applying the Magic Brown Wash to the Troll

I then applied the magic brown wash all over the troll. I applied two coats of the brown wash, each thinned down with some Flow-Aid medium. This provided the subtle shadows throughout the model, including its skin. By using the Flow-Aid and doing two coats, it prevented most of the pooling issue washes can have.

Base Coat Paints:

  • Game Color Hexed Lichen
  • Game Color Orange Fire
  • Game Color Gunmetal
  • Game Color Leather Brown
  • Game Color Bonewhite
  • Model Color Red
  • Game Color White Primer
  • Game Color Cold Gray
  • Model Wash Dark Brown

Dry Brushing Orange

Drybrushing the Orange Details

As dry brushing is a messy process, I hit the orange bill board first. The dry brush catches the edges, such as the wood grain and leaves the lighter color behind. The slightly dusty look works well for the wooden board.

Orange Colors

  • Game Color Dwarf Flesh
  • Game Color Bonewhite

Painting the Troll’s Skin with Washes

The next part was really exciting because not only did it bring the troll to life, but it was so quick and easy to do. Painting with washes has some things to look out for, but can provide an excellent result.

Adding a yellow wash to the troll's skin

I first saw the idea to use a yellow wash on Orks from Greg (@3dgreg) and had to take the idea for the Troll. The yellow provides some warmth that straight washes of green won’t provide. By not using the green wash on certain areas, like the ears and belly, it also adds some color variation.

Applying a wash of green to the troll

The first layer of the green wash was Games Workshop’s Thraka Green. You can see where the yellow is still showing through, providing that warmth.

Applying a second wash of green to the troll

The second layer of green was Vallejo’s Model Wash Dark Green as I had run out of the Thraka. Both colors are nearly identical, and either would have worked. By adding the second layer of wash, it helped to darken the skin and add more depth to the green. This is most noticeable on the belly where I avoided adding any green on the second pass.
Adding brown and yellow glazes to the troll's belly

To give the troll’s large belly some contrast, I used mixes of a light brown and the yellow wash. I mixed this with Vallejo’s Glaze Medium and applied it to the belly, ears, and face of the troll.

I added additional layers with Bonewhite as well which was followed up with a yellow wash to bring it back together.

Adding some green and brown washes towards the edges helped smooth the transition and provide additional shading.

Purple Wash applied to troll's skin

To add some color and bruising, I added a purple wash to the eye sockets, around the bear trap, and lower lip. I also painted in the eye with Red followed by WarColours’ Fluorescent Pink for some pop.

Painting the troll's scales jade green

The final step of the Troll’s body was to paint the scales a Jade Green. I used a bit of the Glaze Medium here so that it kept some of the highlights. The darker jade provided a nice contrast to the skin while maintaining the color tone consistent.

Paints for the Skin

  • GW Casandora Yellow
  • GW Thraka Green / Model Wash Dark Green
  • Game Color Filthy Brown
  • Game Color Bonewhite
  • Game Color Jade Green
  • Game Color Purple Wash
  • WarColours Fluorescent Pink

Blending Purple

Blending a purple cloak

As the Troll is meant to be part of my Orc Blood Bowl team, I want the main colors to be purple. But I also wanted to work on my blending as I don’t often do it. So on my wet palette, I stuck four dots of color from dark purple through white.

You can see the exact colors below, but the idea is to find colors that are in the same tone, but lighter colors. So the three purples are all on the blue side. Thus the Vallejo Squid Pink and Warlord Purple weren’t used but would be perfect for a blend towards the red side of purple.

Blending the purple cloth

The WarColours paint sets make selecting similar colors easy, but I wanted the purple to match the Orcs. So the first layers were a blend between the Hex Purple and Genestealer Purple. I then moved into blending lightest color of the WarColours’ purple range and the Game Air White.

With each mix, I added a bit of the Glaze Medium to reduce the opacity slightly. This is also why I used the Game Air version of the white as it is already thin. Some final texture was added with the white to simulate the worn cloth.

Purple Colors

  • Game Colors Hexed Purple
  • GW Genestealer Purple
  • WarColours Purple 1
  • Game Air White

Painting the Details

With the majority of the troll now finished, it was just a matter of finishing the details.

Painting the Bones and Claws on the Troll

The first detail was all the bones, claws, spine and teeth. I started with Bonewhite and with a minor highlight of pure White. I then went back in with the Dark Brown Wash and provided additional shading.

Highlighting the Leather

I then highlighted the leather areas such as the glove and strap. I started with the base color of Leather Brown and added Bonewhite to provide the highlights and wear marks. Notice on the strap that some texture was added to the leather with small lines. This makes it look like a worn leather belt.

Highlighting the black leather

For the black leather and straps, I used WarColours’ Cool Gray 1. The texture was also applied to these straps, in the same way, to make them look like leather.

Finishing the Base and Details

The final details included adding the team number and the base. I gave the Troll number 8, so he could remember his number by looking down at it! For the large front billboard, I used the 0s from the 10 and attached them. This made it fill in the slot a bit better.

I then reapplied the Dwarf Skin and Bonewhite highlights over the decal to give it a worn look.

For the base, you can check out the tutorial on Stepping Between Games.

And then a few more layers of matte varnish to protect the paint and static grass during gaming.

Blood Bowl Troll Showcase

And here are the final results of the Blood Bowl Troll.

While the baseball throwing pose is a bit odd, I do think the Troll is a nice addition to the team. I have heard from Thor that Trolls are rather difficult to play with due to their stupidity. But that should be fun to deal with in friendly games.

Let me know what you think of this tutorial or the Troll in the comments below!

Good Reads 53

Good Reads 53

Despite the focus on all the exciting changes for 8th edition, there was still a bunch of awesome hobby working happening. So dive in and check this week’s Good Reads and be inspired by your fellow hobbyists.

Good Reads 53

For those new here, Good Reads is where I showcase some of my favorite hobby posts from the week. Some are fantastic tutorials, others are inspirational showcases, but all are worth checking out and giving the blogger a follow.

Bogged Down Durthu

Bog Durthu Conversion

Durthu Conversion by NafNaf

NafNaf is on a roll with his Sylvaneth. This week brings his reimagining of Durthu as a bog demon. Not only is there some excellent conversion skill going on here, but his use of texture paint is impressive.

Your Brain on Art

Image Photo courtesy of the Laboratory of Neuro Imaging at UCLA.

Outside of the usual hobby sphere, I did find this interesting article that discusses neural scientists studying the brain activity of artists. While there isn’t anything substantive in the article, it is interesting to see scientists trying to understand what makes painters like us tick.

Art Imitating Art

Adding Doctor Strange Magic to Miniatures

Floating Magic by Dave G

I loved the Doctor Strange movie, and the cinematics was incredible. Dave G is also a fan and wanted to imitate the way they displayed magic throughout the film. Not only did he do an incredible job, but he put together an awesome tutorial for all of us to follow as well.

Anvil Kill Team

Kill Team using Anvil Industries Bits

Kill Team by Rory

I got my Shadow War book a bit late, so still trying to catch up on this kill team awesomeness. Rory jumped in with these awesome miniatures using Anvil Industries.  They give the team a hardcore look.

Cloud Dwarves

Kharadron Overlords Arkanaut Frigate

Arkanaut Frigate by Tyler

While the new Kharadron Overlords (cloud dwarves) themselves are still warming on me, their sky fleet is awesome looking. Not only did Tyler paint one up to his typical exquisite standards, but his write-up has some great tips for anybody painting theirs.

When Slaanesh Calls

Converted Slaanesh Chaos Space Marine Lord with Lightning Claws

Slaanesh Lord by Blazmo

While Slaanesh isn’t my favorite chaos deity from a design aesthetic, Blazmo’s Chaos Space Marine force he has been showcasing may bump them up a few notches. Between the conversions and fantastic paint job, his Chaos Lord here is excellent.

On Bikes, they Ride

Ravenwing Command Company

Ravenwing Bikers by Dave Weston

Dave has been hitting it off with his Ravenwing project, and this command company is rounding off the army. 13 bikes later and this great looking project gets his big purple stamp of completion.

The Orky Way

Big Mek Conversion with Kustom Force Field

Big Mek by Wudugast

And who doesn’t like Orks? With all the changes to 8th, it seems Orks are going to be a big hit again. Wudugast is joining the Waaaggghhh! with this Big Mek with Kustom Force Field. The paint job is a great example of a grimdark take on the normally colorful faction.

Good Reads 53 Wrapup

I hope you enjoyed this week’s Good Reads, if so, can you share it with your friends? There are a few fancy social buttons below to make it easy 🙂

Finished Blood Bowl Tokens

Blood Bowl Tokens Done

As I try to get a few projects off my painting table, I knocked out the Blood Bowl tokens for both the Dwarf and Orc teams. I wanted them to match the players, but still be identified as tokens, as in mostly metal.

Finished Blood Bowl Tokens

Since I have now finished the Orc Team, The Mighty Squigs, and the Dwarf Team, The Golden Diggers, I figured I should get their tokens done as well. The idea to glue the tokens to the bases originally came from Scott on Twitter (@ryglore), and Thor (@Thor_Thorison) added the idea of gluing the coins as well.

Having the tokens glued to a base should make it much easier to move around and not lose the tiny balls. It should also be fun having the coins stand up on the sidelines.

Orc Blood Bowl Tokens

For my Orc team, I painted the purple and orange over random armor plates and icons. This was fitting for the Orc feel, and I carried it over to the tokens.

Blood Bowl Token Orc Reroll Counter

Since these are supposed to be tokens, I painted the whole thing silver before painting over different parts with the colors. For the Orc hand part, I only did a single glaze of Orkshade Green. Other areas were given a black wash to add some contrast.

Painted Orc Blood Bowl Balls

Two of the Orc balls are one-legged Squigs, a special ball you can put into play. These were painted leather brown before washes of Casandora Yellow and Vallejo Red Shade. Parts of the spiky balls were given the same treatment, figuring that Orcs use Squigs for everything.

And red ones go faster after all.

Orc Blood Bowl Team with Tokens

Even though I didn’t do the extreme highlight that I did on the players, the tokens match well.

Dwarf Blood Bowl Tokens

As the Dwarf team is more orderly, I painted their tokens uniform. Just as with the players, I used WarColours’ One-Coat Yellow to great effect. The blue is striking against the yellow and makes for a bright looking team.

Dwarf Blood Bowl Tokens

The beer foam was fun to paint, and I think it came out rather well. Tough I think I could have used more back lining on the face icon.

Dwarf Ancestor Blood Bowl Balls

The Dwarf special ball is a Master Crafted Rune Ball. These are made out of stone and are extra heavy. I figured they would use the same sapphire material as the gems on their uniforms. And as I look at these pictures, I realized I didn’t highlight the yellow… oh well.

The Golden Miners Blood Bowl with Tokens

I am still enjoying the yellow and blue look for the team.

Up Next

Well, the Mrs. has already confirmed she would get in some practice games with me so I can learn the game. I can then get the rest of my family to give it a try and maybe make a new family tradition.

The next team to go under the brush will be the Skaven. Then I want to get and/or convert some special players for each team. I have a box of Ogors, the Skaven Doom Bell, and the Blood Bowl Troll and Goblins. But at some point, I need to do a Forge World order for that nasty looking lawn/goblin mower.

Final Thoughts on the Inner Circle

Final Thoughts on the Inner Circle

Greetings readers! I am back for my final installment of the series I have been writing on GW’s Inner Circle event. I started down this road what feels like a lifetime ago, with grand schemes of what I hoped to accomplish.

Final Thoughts on the Inner Circle

I didn’t win my local event, and I only scored 330 points. But I learned several lessons that I can pass along that will help you win your next painting contest. I know I’ll be using some of these!

Lesson 1: Paint to the Rubric

All painting contests should have a rubric to let you know what you are going to get scored on and how many points each item was worth. If they don’t, they really need to have one.

Thunderwolf Cavalry by Ben Dake

Once you get your hands on the rubric, really see where you can maximize your point output. The Inner Circle event, for example, awarded extra points for units that had 10 or more models in them or more than 3 models for larger models. I had exactly zero points in this category. While I had the maximum number of units, I didn’t do myself any favors by having less than I needed for extra points.

In my original plan, I had units that met this requirement. Which brings me to my next lesson learned.

Lesson 2: Plan your time carefully

When I started on this journey, my expectations for what I was going to have painted for this event were sky-high.

Some were met, some were not.

Knight Titan for the Inner Circle

In the time between deciding to participate and being judged, there were days when I simply didn’t paint anything. And I should have. This would have saved me a lot of headaches and arguing at the end of this whole process. Had I more effectively planned my time, I could have spent more time with my family and working on commissions while working on my Inner Circle Event.

More happiness all around.

Lesson 3: Build an actual display board

This is a part that I gave very low priority to. I should have given it more attention.

Belisarius Cawl by Ben Dake

My display was literally a 2×2 piece of foam (unpainted) with some unpainted Citadel terrain placed on it. Really embarrassing, truthfully. Just throwing some sand on it and painting it to match my bases would have made the overall presentation exponentially better.

Space Wolf Bikers

The ones I have seen, not only in my own GW store but on the event’s Facebook page, are absolutely gorgeous. I will definitely be working on this between now and June 24 when I travel to my first tournament in Atlanta, GA.

Closing Thoughts

Y’all, I really enjoyed this event and I hope that comes across in this article. The creativity and excitement I saw on display from all over the continent was nothing short of amazing.

Saint Celestine by Ben Dake

For me personally, I very nearly have every model I own painted, which is a very big deal. I also recommend that if you’ve never entered into a painting competition, give it a try! The deadline will motivate you to get things done and before you know it, you will look back and have accomplished a lot.

This community is one of the best hobby communities to be a part of, and people will be more than happy to share their knowledge with you. For years I told myself “no, never” when it came to being active in the community. However, I have no regrets about becoming more active, and I don’t think you’ll have any regrets either.

If you want to get more active, but painting isn’t your thing, that’s okay too! Send me an email at mooseheadstudios86@gmail.com and we can talk about getting your army together and painted for the battlefield, hobby contests, or any other use you may have for them!