Latest Posts

Completed Deff Dread for Dreadtober 2017

Despite this being one of the busiest months I’ve had in a long while, I have managed to finish the Deff Dread for Dreadtober 2017. Adding another stomping wonder of Ork technology to my Death Skulls army.

I won’t get too much into the RL issues keeping me from painting and posting. But I have struggled to keep up with Dreadtober this year and appreciate Todd for hosting it.

For me, painting is a way to relieve stress so I am happy I have been able to get some of that done this month and finish the Deff Dread for my Death Skulls.

Ork Deff Dread

Death Skulls Deff Dread From the Upper Left

My other Deff Dread was pure close combat with four arms of bashing goodness. I gave this one a bit more ranges punch with a pair of missiles launchers.

Death Skulls Deff Dread From the Upper Right

There is a certain irony that Orks are the easiest to convert due to their ramshackle nature. But I also feel the least amount of need to do so and the walkers. They already have so much character and fun built in.

Death Skulls Deff Dread From the Left

I was inspired by Greg’s last set of Orks where he added non-black-and-white checks. On the should I used blue instead for luck.

Death Skulls Deff Dread From the Right

I took lots of pictures during the paint process so I hope to get another tutorial up for the Deff Dread. I already posted one for the Killa Kans and Morkanaut. Painting my Orks are pretty straightforward and messy – perfect for short stints of painting time.

Death Skulls Deff Dread From the Top

I used the plastic bases from GW in part because they are cheap and easy to paint. But also because I want to get some of my minis into White Dwarf. I still have a stockpile of Secret Weapon Miniature bases for future projects though.

Death Skulls Deff Dread From the Front Right

Ready to rip some face!

Dreadtober 2017

As I mentioned at the top, this was my pledge for Dreadtober 2017. Sneaking this post in right at the deadline.

If you haven’t already checked out the other hobbyists work, there were lots of great projects posted on the Dreadtober blog.

Death Skulls Deff Dread From the Front

The Dread Mob Grows

I wanted to leave you with a picture of the growing Dread Mob. This isn’t the whole Ork army, but just the walkers.

Death Skulls Dread Mob Forming

The Stompa needs a bit more love to finish and then I’ll need to add more walkers to the Christmas wish list.

Good Reads 57 – Tutorials, Conversions, Oddness, and More

Looking for some awesome hobby reads to check out? Good Reads 57 is finally here with some of my favorite posts from the last few weeks. There are so many excellent hobby bloggers out there sharing fantastic content, and this is a celebration of some of that work.

I owe big thanks to Scott (@brushwizard) for guilting me into finally getting this post written. Apparently, I have built up an expectation among some of you to get this out now and then!

So without further ado, here are your Good Reads:

A New Plague

Converted Plague Caster

Converted Plague Caster by Da Rednekkz

The creative genius Da RedNekkz does a great job of converting and painting disgusting Nurgle, things. This converted Plague Caster is a perfect example of that. It’s fun to see how artists modify pieces to fit their vision.

A Son to Be Proud Of

Sons of Horus Contemptor

Contemptor by Mordian7th

Modian is well known for finishing whole armies in a week before selling them off to start the next. His current focus is this beautiful Sons of Horus, complete with a great looking Contemptor.

Build a Zone Mortalis from Scratch

Custom Built Zone Mortalis Board

Scratch Built Zone Mortalis by James

I’ve seen a few pictures of Zone Mortalis games, and it looks like a blast to play. The very pricy table didn’t stop James from creating his own tiles. Here he shares the supplies and steps he is using to build up his table for this high octane game.

How to Paint Copper

How to Paint High Contrast Copper

High Contrast Copper by Scott

Speaking of Scott, he has been busy himself with painting his AdMech – with his custom Dominus almost making the cut here. As part of his constant exploration of painting, he wrote a tutorial on his high contrast copper look.

Dominate it All

Converted Tech Priest Dominus

Tech Priest Dominus by Scott

Ok, so maybe his Tech Priest Dominus is well worth checking out too. This is an excellent conversion full of its own character and story. It’s been especially fun watching Scott build and paint this over the last few weeks on Twitter.

Colorful Bloat Drone

Blight Drone by Larg

Ok, so many have been overwhelmed by that amount of Nurgle worshipers that have blessed us lately, but I liked Larg’s Blight Drone. Not only are the colors and paint job crisp and colorful, but I like his slight conversions to the drone. The removal of the top prop alone changes the look dramatically.

Making a Chibi

Sculpted Chibi Deadpool

Chibi Deadpool by Hobbyist Girl

The Hobbyist Girl needed to make a gift for a fan of Deadpool. She also wanted to paint chibi. So she sculpted a Chibi version of Deadpool and shows us all the behind the scenes steps. What I liked about this project is that it shows you don’t need to sculpt super intricate details on everything, especially if you want to learn to sculpt.

The Side Show

the sideshow by Big Boss Redskullz

While some of the INQ28 stuff is a bit out there for me, I liked this chariot queen by Big Boss Redskullz. There is a certain amount of impracticality, darkness, and oddness that meld well together. A great paint job helps complete the story.

Riding the Storm

Mounted Death Corp Army

Death Corp Army by Gothmog

The idea of a cavalry army is the far future has always struck me as odd and awesome. But to see Gothmog build a full Death Corp Mounted Company is amazing. It’s also fun to hear that the weakness of the army was the two tanks he took to fill in some heavy firepower. Clearly, needs more horses.

Good Reads 57 Wrap Up

Well that is is for this Good Reads. I have been so far behind in all things hobby that I know I missed a ton of other great projects. Feel free to add them to the comments for others to check out.

And, if you want a new post from me, you just have to guilt me into it on Twitter…

Magnetising the Big Mek

Magnetizing the Big Mek in Mega Armor

Quick tutorial post on how I added magnets to the Ork Big Mek in Mega Armor. While I don’t generally add magnets to my minis, this guy seems like a good candidate to work on.

Magnetising the Big Mek

This Big Mek is from the Meganobz box where you can build one of the Nobz into a Big Mek. The arm weapons don’t have options, so it is the backpack mount that I magnetized. This way I can either arm him with the Kustom Tellyporta Gun (which sounds fun) or provide a defense with the Kustom Force Field (probably more helpful).

Drilling the Holes

Once the main body and legs were built up, I left the top armor plate off. This is meant to be the weapon’s platform but works perfectly for adding the magnets. I set the piece in place and used a small drill bit to drill through it and the top of the body.

To prevent the magnet from moving, I didn’t use a larger bit as the top plate so it would hold the magnet in place.

drilling pilot hole in the megamek

I then swapped the top plate to the weapon sides. Both bits have a given location it aligns with the bit. Once I got it in place, I used the pilot hole to drill into the weapons.

Magnetizing the Big Mek's Back Options drilling pilot holes

Now I knew exactly where the magnets all needed to go to line them up.

Adding the Magnets

To get the magnet in the main body, I used the 1/8″ bit which is the same size as the magnets I’m using. Centering on the pilot hole, I drilled into the body and cleaned it up.

I then used super glue to attach the magnet to the top plate. A dab of plastic glue and I attached the top plate, holding the magnet, into place.

Adding Magnet to top plate of big mek

The same was done for both weapon options. To get the magnets to align properly, I placed a piece of paper on top of the body and set a magnet onto it. I then put a dot of super glue onto the magnet and placed the weapon in place.

I could then use the paper to lift the weapon and magnet and let the glue dry. While a small amount of paper attached itself to the magnet, I later cleaned it all up and covered the hold with Liquid Green Stuff. This provided additional support for the magnet so it wouldn’t pop out later.

adding magnets to big mek's weapons

The Results

As you can see, both weapon options fit neatly into place allowing for flexibility and fun. This was a fun little magnet experiment and took hardly any extra effort.

Magnetizing the Big Mek Weapon Options

What do you guys think? Do you do many magnet conversions to allow weapon swaps?

Dreadtober 2017 Banner

Dreadtober 2017 Announcement

Yeah, finally some Dreadtober news for 2017! TL;DR: it is happening, but Todd is hosting it this year! So get ready for Dreadtober 2017!

Dreadtober 2017 Banner

As this is the third annual Dreadtober event, many of you have either participated or at least witnessed the challenge before. Last year I hosted almost 100 hobbyists around the world to build, paint, and photograph a dreadnought type miniature. Over 50 finished their projects and tons more cheered them on.

Where to Get Involved for 2017

This year Todd (SincaiN40K) is in charge of the event and decided to create a whole new website over on Blogspot to run it. Heading over to dreadtober.blogspot.com is where you can find out how to get involved and check out the latest updates.

He has even set up an email address for the project to make it easier to keep track of going forward. So if you are excited to get a dreadnought-ish miniature built in October, sign up!

As for me, I am transitioning jobs at the moment and starting a role and a new company. So October is going to be even busier than the last few months have been. I still have a Deffdread that is built and primed, so if I can sneak in some extra time I plan to get it painted up.

Book Sale Bonus

While I am not running the event this year, I will still be reposting some of the helpful posts I wrote up last year on building, painting, and photography.

How to Improve Your Hobby Building Skills BookAnd to get everything kicked off right, I am set up Amazon to give away copies of the Kindle edition of my book this weekend only! This book is all about building miniatures, including converting and tips on sculpting.

From September 29th through October 1st, you can grab a free copy on Amazon (I hope it works for all countries!). The only thing I ask is you read it, put it to use for your Dreadtober entry, and give it a review on Amazon.

Let’s Get Started!

So head on over to dreadtober.blogspot.com and sign up, and this weekend make sure to grab a copy of the book. I will be jumping where I can and resharing as many posts on the social networks as I am able to keep up with.

This is DREADTOBER!

Work in Progress Wednesday – Update on What’s on My Desk

The last few weeks have seen a bunch of sporadic hobby projects for me, but for some reason, little writing here. So, here is a look at my workbench and the randomness therein.

While one of the things I have promised myself to work on is to finish a bunch of my half-finished projects before starting anything new, I have failed at that big time this week.

I have found with myself that sometimes I just don’t feel like painting. Just the idea of it overwhelms me with ‘meh.’ Odd considering that this is my hobby and one of my biggest stress reliefs.

Instead, I find the desired to build models to be where I get pulled. So that is where I have been since I finished the Megaboss.

Mentor Legion Terminators

It started with moving my workspace inside. My gracious wife recommended we move the boys into the same room and use the smaller bedroom as my new office. And in this new office, I could finally setup the bookcases with glass doors to use as a display case.

While digging out my Mentor Legion, I found a few Terminators I had started re-posing a few years ago. Along with them were the Dark Angles from the Dark Vengence set. I knew I had more terminators in my bits box of shame that I should build up.

Mentor Legion Terminators Build WIP

Well, it turns out I had thirty of these terminators along with the Blood Angel’s Capitan in Terminator armor. Each had come from various box sets over the years. Assualt on Black Reach, Dark Vengence, the Space Wolf vs Orks campaign, and the Space Marine big box.

Now I love the idea of the terminators, but the basic guy is so bland and blocky. Especially compared against the DV set or Space Hulk minis. But with some simple adjustments to the pose, you can make a big difference in their look.

Mentor Legion Terminators with Missile Launcher

Armed with a pin vice, 1/16″ brass rod, and needle nosed pliers, I adjusted the angle of arms, hands, and even one of their legs. These were later filled in with putty and attempted to sculpt ribbing. Small adjustments to the arms changed the feeling and movement of the mini. From opening up the pose to making it look mid swing.

Mentor Legion Terminators with Assault Cannon

Many of the chapter specific icons I was able to scrape off. But I also left many of the general wolf, wings, and sword motifs and plan to work them into the warrior’s heraldry. Figured that I could use some of the old fluff for the Mentors where they would train with other legions.

Mentor Legion Terminators with Assault Cannon

Since I am not a gamer anymore, I have no clue as to the effectiveness of any of the weapon options. So instead, I went with the rule of cool and mixed it up.

Mentor Legion Assault Terminators with LIghtning claws

This resulted with a squad of Lightning claw shredders.

Mentor Legion Assault Terminators with Thunder Hammers

The Titan Squad equipped with Thunder Hammers and shields.

Mentor Legion Terminators with Heavy Flamer

And four squads of ranged Terminators, two with assault cannons, one missile launcher, and the last with a heavy flamer. Each squad has a couple of chain fists to make sure they can break open all those tanks.

Mentor Legion Terminator Captain Conversion

The Capitan was only slightly modified from the original miniature. Notably, the bare face was replaced with a helmet (actually only one bare head made it into the build). Some of the Blood Angel icons were removed and some replaced with other icons where needed.

Ork Mek in Mega-armor

Another box in the backlog was Meganobz kit – also from the Space Wolf campaign box. My grown hoard of walkers needs some Meks to hammer things into place, so I busted out the Mek from the kit.

Ork Mek in Megarmor with Kustom Force Field

While I figure the shield generator would be more useful in the game, the teleporter weapon looks awesome. So I busted out my much-neglected magnets and actually put them to work. With a magnet sitting under the top armor of the Mek and matching magnets in each of the options, I can easily swap back and forth.

Ork Mek in Megarmor with Telleporta

I also had the normal Mek sitting in the box so I quickly put him together. I think from the random bits between the two, I should be able to create a third – Deathskulls have a lot of scraps after all.

Painting the Buildings

The one thing I have been putting paint to this last little bit is one of the big buildings I built for my table. As these things are huge, it has mostly been dry brushing with the biggest brush I have.

WIP Gothic Ruins Building on TableScape Tile

I want the buildings to be neutral shades of color. Enough color to be interesting, but not stand out. They are also so large that my normal bottles of Vallejo paint would not do. It would a few bottles per building!

WIP Gothic Ruins Building on TableScape Tile

So instead, I am using standard acrylic tubes from the craft store. Not the stuff made for kids (it doesn’t stick well) but from the ‘fine art’ department. They are super high pigment and thick, so would be difficult to use for normal miniatures, but for dry brushing buildings, they work great.

I will write a post with more details about the paint job once I finish, but I am happy with how it is turning out.

The Backlog

As part of this office cleanup, I have also started going back through the back log of other projects in the bits bin. I plan to update my old Trello board and do some triage on all the old projects.

I spent a good deal of time going through my big bits box of unbuilt models and started clipping parts into baggies. I plan to build up a few more random models and get everything primed. Found a Rhino I plan to turn into a Razorback, a drop pod, Ork Boyz and Nobz, and the rest of the Dark Vengence kit I never built.

With the sunny summer starting to come to an end, I will have plenty built and primed for the next 8 months of rain.

Converting the Orruk Megaboss into a Death Skulls Warboss

Ork Warboss (Orruk Megaboss Conversion) Showcase

This week I finished my Ork Warboss for my Death Skulls tribe. He is an Orruk Megaboss conversion with just a few minor conversions to bring him into the 40k universe. Here is the final showcase and some notes on the conversions themselves.

Converting the Orruk Megaboss into a Death Skulls Warboss

Ork Warboss

When the Orruk Megaboss was released, I knew I needed to convert one for my Ork Warband. Just over a year back, I posted my unboxing thoughts and ideas for the conversion. The work continued off and on for the last year in bursts.

But here he is at last, my Orruk Megaboss conversion into an Ork Warboss.

Orruk Megaboss Conversion into Ork Warboss

One of the final additions I made was the larger base, thanks to an indirect prompting from NafNaf. I had originally posed him on a 40mm base from Secret Weapon Miniatures. But felt it needed to be bigger and have more height.

Converted Tyranid Skull for megaskull

The Tyranid skull was also a later addition that I had planned on doing once I glued the front bit into place. I had left it off to paint his face. After a bit of green stuff to fill the gaps, I added more putty to create the carapace ridges.

I used a Tyranid Warrior’s head as a reference and painted it to match my Behemoth army.


Close up of face for custom megaboss


I feel like his skin is one of my best efforts to date. I spent a lot of time highlighting the green skin and adding red, brown and yellow glazes. I also wanted the texture to be softer on his skin so I used more blending and glazes as compared to the sharp highlights on the armor.

ork megaboss skin

Even though much of his back is hidden from normal angles, I added a bunch of liver spots to break up the large, flat muscles.

Ork Megaboss Conversion With Custom Big Shoota

The weapons were fairly straight forward conversions as the hands were already separate bits on the Megaboss. Because they aren’t the main focus of the mini, I didn’t want to make them too snazzy (leave that to those Bad Moons). So the majority is rusted metal with small panels of colors.

Ork Megaboss conversion with buzz saw hand

The buzzsaw was painted a bit brighter metal since it would be more active in the choppy action. I debated on adding blood splatter but decided against it for the time being as I figured it wouldn’t add much and distract from the other colors.

The Orruk Megaboss Conversion

For those interested in the actual conversion, here are some of the WIP pictures.

The Orruk Megaboss kit is an impressive feat of engineering and an abstract puzzle to put together. It took a lot of fiddling to get the different chest pieces to fit into place. I used sticky tack to piece together some ideas.

As you can see, some stayed, others removed. While the demon head is kind of cool, it looked out of place. So an Ork glyph was swapped in. The boss pole also didn’t make the cut. I’ve seen some with awesome back banners, but I thought it took away from his bulky frame.

The new additions to his face were bits removed from the custom combi-shotta, in turn from the Deff Dread kit. I also rotated the buzz saw as now emphasized his posture of shouting down his enemy.

Megaboss Basecoat and Wash

When painting, I left the front piece of armor off. It would only leave a glue seam along the two shoulder pads. Unfortunate locations, but it could have been worse. By keeping it off, I was able to finish the face and arms without all the extra armor plates being in the way.

It was nerve wracking gluing the pieces back together and sculpting the new details. I kept thinking I was going to scratch the face or stick a big glob of putty into his mouth.Sculpting tyranid skull onto megaboss

I used Milliput black as I had that available, but in hindsight, Green Stuff, or at least something not black, would have made it much easier. The black is hard to see while working with it.

Custom base for the ork megaboss

As I mentioned up top, I had originally planted him on a simple resin base. But after all the effort to paint this guy, I knew he needed something more. The struggle was to provide the angle to match his stance. The original model has a chunk of rock under his left foot that I had removed.

So combining my tips from creating custom bases, and some new learnings from Andy’s scenic base tutorial, I got to work on this ruined walkway. I hacked apart some flooring pieces to fit the round base and propped them up with some cork. A couple of ruined tubes, obligatory skulls, and putty to fill in the gaps.

Wrap Up

Orruk Megaboss Conversion into Ork Warboss

Thanks for checking out my Warboss and Megaboss conversion. I would love to hear your feedback, thoughts, and criticism below in the comments. Especially if you think an area could use more work.

Good Reads 56

Good Reads 56 with Orks, Maps, Mutants, and Marines. Get Inspired

Another awesome week of hobby posts is upon us. So come check out my selection of hobby posts you should not miss in Good Reads 56.

Good Reads 56

Heros of the Empire

Dark Angels Successor Guardians of Covenant

Guardians of Covenant by Bruno

These beautiful conversions and the alternative paint scheme is what caught my eye with Bruno’s Dark Angel successors. Particularly the bone-white for his Captain, converted from the Space Hulk set.

And the Mutant

Mutant converted with snail shell

Mutant by Wilhelm

Wilhelm has made some incredible conversions, but this may now be one of my favorites. Using a real snail shell, Crypt Horror, and Plague Drone, the Abalone Mutant was born. The paint job is also brilliant with the mix of blue, white, and purple.

Drawing Fantasy Maps

How to Hand Draw Fantasy Maps

Hand Drawn Map by Daggerandbrush

I’m always impressed by the tutorials at Dagger and Brush, not only because of their quality, but also they aren’t your typical topics. Like this one on how to draw fantasy maps! From DnD adventures to story based campaigns, drawing a custom map can really tell the story.

Men in Black

Primaris Death Watch Marines

Deathwatch by Jeff Vader

Jeff has done some incredible conversions, but for this squad of Deathwatch Primaris, he is showcasing his painting skills. Between the various shades of black and freehand icons, this squad really comes to life.

Making a Scene

Creating a Scenic Base for the Wizard

Andy wrote this guest post for Broken Paintbrush on how to create scenic bases and displays. Lots of awesome tips to help your characters stand out or building a board for Armies on Parade. Plus he has some incredible finished pieces in there too.

One Weird Boy

Converted Weirdboy from Savage Ork boss

Converted Weirdboy by Greg

Greg has been a painting machine the last few weeks as he works to get his army ready for NOVA. But that doesn’t mean he hasn’t made time for awesome conversions such as this Ork Weirdboy. Make sure you click through and check out his Waaggh! banner as well.

Never Too Old to Hunt

Chaos Space Marine Predator

Predator by Thor

With the resurgence of 40k, Thor broke out an old (ancient even) metal Predator and finished it in his Disciples of Twilight. Lots of great detail and weathering including the Chaos star in white.

Dinos Rule

Repainted Dinos by James Wappel

Just to prove that the quality of the miniature doesn’t need to matter, James has been repainting toy dinosaurs into incredible works of art. Yes, those soft, chubby toy dinos we all played with as kids. With some added layers of paint, and vibrant color choices, they look like display models instead.

More Rainbow Warrior Progress

Dan put together another update video for the Rainbow Warriors Project! With three squads of tactical marines showing up to his desk last week, along with the custom printed decals, he has been busy getting them based.

Good Reads 56 Wrap Up

Well that is it for this week, I hope you found some great hobby content to enjoy and maybe learn a new trick or two. And don’t forget to share with your hobby friends so they can check it out as well!

A review of Greyed Out Dice Bags

Cool Tools: Greyed Out Dice Bags

I’ve seen @greylikestorms dice bags now and then on Twitter, but never really paid too much attention to them. I thought dice bags were one of those things ‘hardcore’ players did. The same ones who came dressed up in costume or carried a banner to events.

But after having the fortunate chance to get to know Mike as part of the Rainbow Warriors Project, I have changed my mind and even bought my own bag.

A review of Greyed Out Dice Bags

Why Dice Bags?

For many tabletop games, dice are used to test skills and perform heroism. Bigger games require more dice. Sometimes whole piles of dice.

Looking at you orks and all your dakka

Forever I have been using resealable plastic bags to hold my dice between games. Functional, cheap and easy. But they rip or disappear in the fog of war (more likely blown away and picked up as trash).

Greyed Out Dice Bags

Thanks to the power and reach of Twitter, I have seen Mike’s dice bags pop up now and again. But it wasn’t until we started interacting as part of the Rainbow Warriors Project that I paid too much attention.

Not only did Mike break out an awesome looking bag for the project, but offered to customize a bag for each of us. I took him up on his offer for a bag for my Mentor Legion.

We discusses a few colors and details, and about a week later he sends me a picture!

Mentor Legion Dice Bag

In terms of quality, these bags are well made. The cotton is a thicker weight, almost a canvas and the stitching is tight and neat. And with the double layers (green and white in this case) these bags feel like they will hold up to abuse of gaming.

Dice bag holding dice

Last weekend I actually got a quick game in with my wife as I was teaching her the 8th edition rules (thanks to being only a few pages now!). So I found as many of my old dice that I could and dumped them in.

Ignoring the scatter and artillery dice, I probably had about 40ish dice in there and it was mostly empty. These things could easily hold hundreds of the smaller dice to make even the biggest Gitz happy with the dakka they could through.

The flat bottom and stiff sides made it super easy to through dice into the bag or grab more out when needed. It means that there shouldn’t be random dice spread across the gaming table or spilling out when bumped.

Mentor Legion with their dice bag

One of the cool parts of having the custom bag is having it as part of the army. As you can see, Mike did an awesome job of matching the colors and logo of the army. It’s a little thing, and I could have easily picked a more generic style, but the it feels awesome to plunk this down next to my Mentors.

In terms of price, it looks like most of the bags run between $20 and $30. So way less than a new character model. He does have a couple of leather bags shaped like D20 at the $50-$60 make, but look awesome. You can see a selection of his bags on his shop.

Note: I don’t get a commision and Mike didn’t even ask me to write this up, but I thought he bags are awesome, and I have found Mike to be an awesome part of this hobby community.

Your Thoughts?

So what are your thoughts on dice bags? Do you have one of Mike’s or from another maker? Hit up the comments and let us know.

WIP Updates 8-9-17: Ork Megaboss and Stompa are back!

Trying to get in the habit of writing more WIP posts, especially as I bounce from project to project. In my typical hobby butterfly fashion, I set the Dark Imperium box aside in favor of finishing off some Orks!


Rainbow Warrior Deathwatch

But first off, I did finish the Deathwatch marine I painted using the Rainbow Warriors scheme. I took a bunch of pictures along the way and plan to do a full tutorial on painting him shortly.

Though I am still 50/50 on the leopard print. I may go back and fix that first.

Rainbow Warrior Deathwatch Space Marine

Also, for the Rainbow Warrior Project, I am helping to set up the site. So in all my glorious free time (hehe) I am setting up another WordPress site for the project and allow all the contributors to showcase their miniatures. I’ll post more updates on that as I make some progress.

Stompa!!

In Ork news, I broke out the Stompa project box (yeah it’s taken that long I have it in a file box!). Where I last left the Stompa, I had the main body finished, minus all the little bits. So out come all those little bits onto the painting station.

The first to get knocked out was the big skull belly plate. Being the Death Skulls clan, it of course in a giant blue skull! With some copious amounts of scratches and weathering, it came together fairly quickly.

Stompa Death Skull Belly Plate

And glued into place. While Orks are known for their planning, I did have the location of the skull pre-planned so the armor plates behind the eyes would be red and not blue plates nearby to obscure the skull.

WIP Stompa for the Death Skulls

Next up is the little windows covering the grots, the skull plate that broke off the banner, and the back scaffold thingy. Oh, and the Grots are in the process of being painted with washes.

Warboss

But that is not the main attraction! The other long standing Ork project I am trying to finish finally is the Megaboss conversion. I last left him with the skin and face completed and all the armor plates base coated and washed.

But the front armor was still unglued (to paint his face). So I glued it into place and closed the gap with Liquid Green Stuff. That was nerve wracking though! Trying to scrape and sculpt a partially painted mini was stressful.

WIP Ork Megaboss Converted Tyranid Skull

But I continued and started sculpting the skull into a giant Tyranid head. It’s a neat bit on the mini, but I needed to bring it into the 40k world and adding ridges was an easy(ish) solution.

So I read back through the sculpting tips from Mr. Pink, and started with the topmost ridge. I layered on each set once the previous dried. It was a long process of waiting for the putty to dry, which is why I worked on the Stompa at the same time.

Once completed, I painted it up in the same colors as my Hive Fleet Behemoth.  Not only does this tie him into my other armies, but the blue fit perfectly with the scheme as well.

Painting the Tyranid Skull

All the metal areas were weathered a bit more with rust powders before being sealed in with spray varnish. From there it was highlights of Gunmetal and Model Air Aluminum. I’ve also highlighted the blue, white, and red armor panels which nearly completes him.

WIP Ork Megaboss for the Death Skulls Clan

The final areas to paint are the straps and leather trousers. I will then add some more weathering powders over the whole mini to tie it together. As this model comes together, I feel it is one of my best painted yet and am super happy with him.

That’s a Wrap

So that’s what is currently on my painting table. Hopefully, the Megaboss will be done soon, and more progress will be made on the Stompa. I’m not sure if I will finish it anytime soon, but rather continue to make steady progress while I paint some other projects.

Brush Stroke #5 Broken Paintbrush Newsletter

Brush Stroke #5

With another archive post of my weekly newsletter, Brush Stroke #5  bring you some great tutorials and showcase pieces from Broken Paintbrush and other hobby bloggers around the web.

Brush Stroke #5 Broken Paintbrush Newsletter

If you haven’t subscribed yet, Brush Stroke is my weekly (currently bi-weekly) email where I highlight the posts from this site so you can stay up to date. But I also add some awesome articles that I have found in the archives of other hobby bloggers. So while Good Reads highlights recent posts, Brush Stroke dives into the archives.

Painting: Hounds of Tindalos

Primed and painted hound of Tindalos

For the Mansions of Madness (1st Edition), I created this tutorial for the creepy Hounds of Tindalos. It was my first attempt at a lava scheme, so I share my thoughts on how I did it.

Painting: Rusty Gold

Painting Aged Gold Tutorial

Rusty Gold Landraider by MG

Came across this fantastic article on painting rusty gold – a beaten, dirty gold look from MG which is fantastic on his marine vehicles.

Building: The Original Interceptor

Converted Stormhawk Interceptor

Converted Interceptor by Danny

When I got my Stormtalon, I had looked around for other people’s conversions as I didn’t like the base model. Danny’s conversion is very similar to the new Interceptor model – cool conversion if you want the new plane and have an old kit lying around.

Building: Genestealer Beast Build

Tyranid Beast by Wilhelm

In this week’s Good Reads is Wilhelm’s custom base tutorial, a base for a fantastic Genestealer beast. He followed on with how he built the monster from an old Carnifex and shares his thoughts on the process.

Inspiration: Good Reads 27

Scratch Built Tanks by Klaus Fischer

This week also had a Good Reads showcasing some great blogs from around the hobby. This week had robots, scratch built tanks, and Death Guard Knight Titans!

Inspiration: Putty and Paint

Do you like looking at fantastically painted miniatures? Putty and Paint is an invite only showcase site that has some amazing artists. Being invite only could be viewed as elitist, but they also work hard to curate the work, so it is a fantastic experience.

Wrap Up

I hope you enjoyed this throwback Brush Stroke. Remember, if you want this type of content delivered directly to your inbox, sign up below. Not only will you be able to keep up with the going on here at Broken Paintbrush, but I hope you also find some awesome things to learn or inspire you on your next hobby project.

How to Build Scenic Display Pieces

Creating Scenic Terrain for Bases and Dioramas with Andy

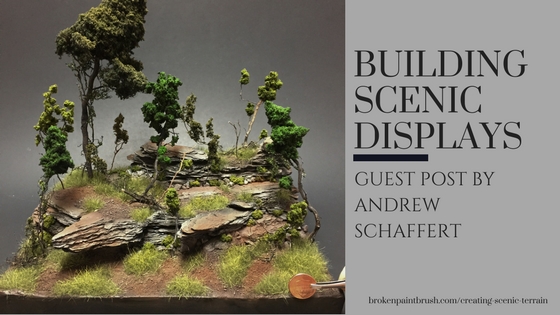
Greetings, this is my humble tutorial on how to build terrain, specifically a rocky outcrop with vegetation and trees. This is my way of making terrain pieces/diorama backdrops for miniatures; however, there are many fine ways to make great looking terrain/dioramas and bases, and I hope you do your research and experimenting to come up with amazing things!

How to Build Scenic Display Pieces

I would never be so bold as to say my method is the only way nor the best way. It is merely a way that works for me, and I have borrowed many techniques from other tutorials who need their just due.

I want to welcome Andy to the Broken Paintbrush community with this awesome tutorial. I hope you enjoy the tutorial, and if you want to save it for later, fill in the form at the bottom and I will send you a copy.

Namely Massive Voodoo Blogspot, 3-T Studios, Painting Buddha, countless others on Youtube and Coolminiornot. I apologize if I used some of your techniques and did not give you a reference; however, I would feel a lack of integrity if I did not credit my sources for pioneering my techniques.

Building a Scenic Base with Layers

I hope you enjoy this tutorial.

Step 1: Board Meeting

I borrow much from 3-T Studios method in this phase.

Find a rather thick board for your base. I used ¾ inch particle board for this particular forest scene (sorry for those of you not using the imperial system of measurement, glory be to The Empire). Choose something so that the sides won’t curl up if they receive a little moisture.

Glueing bark to make a scenic terrain

Next, select exotic pieces of bark that will make interesting rocky outcrops. Take a little time to see how they orient themselves on your base; at this point (in many cases), the base kind of builds itself as you combine bark shapes to create an evocative landscape. Once you have decided on a particular aesthetic, secure the nuggets with hot glue (as 3-T Studios writes, the clay, or if you decide to use Plaster of Paris or wall filler, will bind it all together).

Step 2: Build up the topography.

Use cork board or XPS to build up the elevated layers between the large pieces of bark.

This step is important so that you can use thinner layers of DAS air dry clay, or if it is a small base (this is a favorite on Massive Voodoo) Milliput, to finish the terrain contours (it will dry faster and prevent cracking). Think of this as a rough outline of what you want the final product to look like; they don’t have to be exact.

Creating Scenic Terrain by adding Cork

Secure the items on the base with hot glue like the nuggets of bark. I chose cork board because hot knives and XPS anger me when making terrain (they are great materials really, I just prefer corkboard when you aren’t making an entire game-board).

Step 3: Build Those Wonderful Contours 

I used DAS air dry clay; you can get it on Amazon for around $11.99. I used the terra-cotta color, and they have a white variation (if you use it, please let me know how it works).

Fill in those gaps between your wonderful nuggets and your cork board and make sure you cover all exposed areas with a thin layer of the clay. No natural terrain is completely flat (I am sure a geologist will correct me here) so make sure you have a nice variation on the surface of your landscape. Use some water to smooth out finger prints and any other mistakes (if you’re like me, there will be a few).

Using DAS to Fill In Scenic Base

Note: I used some bases to see what the spacing of my minis will be. So don’t overthink about the bases on this picture. You can set in the bases if you want, but I chose to magnetize my miniatures to the diorama.

Admin Note: I learned about DAS somewhere, but forgot, so sorry if I am not giving you credit here.

Step 4: Square Off the Edges

Once that wonderful clay dries in the air, fill in any areas or mistakes you made with some plaster, wall filler, etc. (there are many names for that white goo you stick on your wall to repair the holes you made while practicing your Dragon Punches, Hadoukens, and Hurricane Kicks). Also, make sure you add a thin layer around the base.

Use a Palette Knife to Square the Edges

Apply with a small putty or palette knife (that thing Bob Ross used to make those happy little mountain ranges).

Step 5: The Sandlot or True Grit

It will take 24 hours to dry, possibly less if you used thinner layers, possibly more if you made thicker layers.

Sanding the edges of the Scenic Diorama

Use a 120 grit or 180 grit sandpaper to smooth out any sharp edges on the surfaces and the border of your base. Not a whole lot more to this step except to wear a dust or safety mask while sanding, you want to prevent breathing the small particulates entering your lungs and besieging your airways with tiny trebuchets and shield walls, not really, but seriously wear the mask to avoid injury.

Step 6: Do the Chickens Have Large Talus?

In this step start adding the larger rocks to your diorama. I used aquarium rocks for the larger bits of the talus (the rock dingleberries that fall off of mountains due to erosion). I used super glue to adhere the rocks to the bases of the rock formations.

Use Talus and other Small Rocks

Try to imagine where rocks would crumble down after years of being exposed to the elements. You can always spread some around first to see if you like the look, then adhere them afterward. 

Step 7: You The Man With The Dirt?

Using some wood glue mixed with water, liberally apply the adhesive to your diorama.  (I used a mixture of about 1/8 water 7/8 wood glue) spread some dirt on your terrain piece.

This is a great tip from Massive Voodoo, grab some dirt from natural sources. As they say, go on a hike, and be that peculiar fellow who brings a trowel whilst walking around (we are peculiar individuals anyways considering we are fascinated by the art of painting tiny things). I used dirt from my backyard because it has a great variation of particulate size and, since we don’t live in the Waterworld universe, it is free.

Use Dirt to Add More Variation

Avoid completely covering up your wonderful outcrops and carefully add it amongst your talus.

Note: the amount of dirt, rocks, etc. is dependent on what kind of look you are trying to achieve. If you want a barren rock outcropping, less is more. If you want a dessert, probably a little more fine sand. Just visualize what you want your terrain to look like and apply accordingly.

Step 8: Optimus Prime

Prime your model.

Prime the Base Black

Not a whole lot else to add here. It may take a few coats, but everyone knows how to prime. Get a can of matte or flat black spray paint and go to town. When you are done, it will look like you opened a bag of Kingsford for a barbecue. 

Step 9: Paint Your Little Creation

I used a combination of airbrush, oils, dry brush, etc. to get variation and depth in my soil and rocks.

This step is entirely dependent on your style and what effect you want to achieve. You can use whatever colors you want because you are an adult.

Paint the Rocks and Dirt Natual Colors

In fact, you can also drink soda with breakfast, or eat dessert before dinner if you want because you’re an adult. If you are a youngling reading this, then you may not be able to drink soda with breakfast or eat dessert before dinner, but you will be able to one day.

Remember to highlight at the end so that those bright colors don’t get muddled. If you are unhealthily introspective like me, you may be asking yourself at this point “why am I painting dirt?” This, of course, may lead to some sort of philosophical crisis, but that is not within the scope of this tutorial.

Step 10: Bring Me A Shrubbery

In this step, you add the grasses.

If you want a rocky terrain with no vegetation you can omit your step; however, I want a forest for my miniatures. I used a reference picture for my grass and added accordingly.

Be patient in this step because you can always add more grass later, but it is a pain to take it away. I applied long static grass using my home-made static applicator. The static applicator allows the grass to stick straight up when you glue it to your base.

I used wood glue and made my static grass from woodland scenics tall grass kits. Get a few colors and cut the tall grass into various lengths from 3mm-9mm, mix the various lengths and colors altogether and run them through the static applicator.

Using Static Grass and Small Shrubs

This gives you a realistic variation of grass length, in nature, blades of grass are seldom all the same length or the same color. You can learn how to make a static applicator in this video, and this is the tall grass I used was from Woodland Scenics. 

Creating a Scenic Base for the Wizard

Careful with the static applicator, I shocked the living……. out of myself multiple times. I have found a pair of rubber gloves invaluable. For if you shock yourself your hands clench like you have been tasered and you may drop that wonderful treasure. Ruining that tiny universe (the poor wizard featured in this tutorial was a victim of me shocking myself, and only through many bull sacrifices to Sigmar was he resurrected).

Step 11: “I Am Root!”

Add trees, other flora, dead-fall (not that Dreadful Nicolas Cage movie), and scatter.

I made my trees from roots that I dug from the ground. Go to your favorite park and find some roots, preferably some with good capillary structures.

Sometimes as I am digging roots out of the ground at my local park (there is a fantastic treasure trove of them near a pond), I ponder “how did it come to this?” Everyone else must think that I am out of my mind. Oh well, some weirdo has to dig roots out of the ground, and I was so pleased to find that the fellows from Massive Voodoo do the same.

In the back of my mind, I am hoping maybe one day we can go on an eccentric root digging adventure…….

Anyways, I digress.

After you select your roots, trim them into your favorite tree shapes, wash them, and lacquer them. I used spray on lacquer; matte varnish will work as well. This will preserve the product and allow for easier priming and painting. If you want a particular color, go ahead and paint them before adding the leaves; however, some of the natural colors of the roots make them look natural (dog gone, imagine that!).

Note: Once you have placed your shrubs on the ground, Massive Voodoo suggests you use some thinned down paints and give your little clumps of grass a light wash. This works fantastic and gives it great depth.

Adding Trees and Foliage for the Final Result

Note: Mr. Oliver Spaeth aka Honour Guard is a grand master terrain maker. You should look him up and glance at his galleries, for his foliage and flora is truly stunning.

I built the leaf structures using Woodland Scenics clump foliage. I used super glue to painstakingly give them the shape I want; it is easier with the large clumps, and good, believable trees are difficult to make, so be patient with adding your clumps.

You may see some tutorials on Youtube saying you should use the spray adhesive. Personally, the adhesive is weak, leaving much of the foliage falling off over time. Perhaps I tried the wrong spray adhesive (I tried three different types), but I have found that taking my time is better in the long run.

I airbrushed the shades underneath and highlighted overhead to give it more depth. I made the small shrubs between the rocks with the same materials as the leaves on the trees and with the same painting method (I found the colors rather flat out of the bag, so I added some depth).

Scenic Diorama for a Robot

Also, you can use some of the trimmings from your roots to make little bushes and things as I did on my Dust Tactics Silent Death diorama (fancy name for the turquoise robot thing I made, I don’t know how a clunky robot can be silent…)

Once you complete your trees, drill some holes into the diorama to secure them into the base with super glue. With the left over roots, you can pull them apart and make some deadfall.

Step 12: Secure Your Miniatures

This is the final step.

Creating a Scenic Terrain Display for the Falcon

This step is really up to you as to how you want to fix your glorious miniatures on your diorama. I chose to magnetize them so that others can take them off and admire the details that I added. Also, I if you use them in a game you can add them to some auxiliary bases.

Step 13: Share Your Work

If you enjoyed this tutorial, I would love to see what you come up with. I would be humbled if you took these words of advice and made something fantastic.

Final Note, I have included various finished pieces that I have created. Also included are various WIP stages of the aforementioned pieces, so that you can get a glimpse of how it looks at first, and what the end product looks like. I have, with my blunt hands, achieved decent results, so I hope that those of you who actually have talent can make something far superior.

Final, Final Note: I had to copy Mr. Oliver Spaeth’s coin scale picture. In no way is this original on my end, and in no way does my work hold a candle to him.

~ Andy Schaffert
    Educated Scholar
    Waterworld Reenactor
    Digger of Roots
    Amateur Tiny Tree-herder

Finally, If you are interested in my little gallery, you can find me on Imgur and Facebook.

Good Reads 55

Good Reads 55 – Bog Daemons, Tzeentch Titan, Sculpting, and More

Catching back up myself, I present to you Good Reads 55 with some of my favorite hobby blog articles from the week. With some incredible conversions, tutorials, and inspirational pieces, these are well worth your time to read.

Good Reads 55

More Demon Trees

Bog Dryads Converted Sylvaneth

Bog Dryads by NafNaf

I don’t think I will get tired of seeing the incredible conversions by NafNaf. He has been adding to his Bog Sylvaneth, with some corrupted Dryads and Bog Wraith Bitch. The seamless transformation between Nurgle demon and Treeman is incredible.

Tzeentch Imperial Knight

Converted Tzeentch Chaos Knight

Tzeentch Knight by D Powers

Another incredible hobbyist, D Power’s latest project involved converting a Tzeentch themed Chaos Knight. There are so many cool little details, from the chess themed base (everyone is a pawn of Tzeentch) to the tentacle fist, to the portal to hell on the tilt shield.

Making Bandanas

Sculpting Bandannas for Ork Freebooters

Sculpted Bandanas by Hobbyistgirl

Not only has the Hobbyistgirl joined the ranks of hobby bloggers, but she started out with this great tutorial on sculpting bandanas for her Ork Freebootas. It adds a lot to their look and really brings in the theme.

Sculpting Videos

Mr. Pink is back to making video tutorials on how to sculpt. The first three video dive into the basic tools, putty, and techniques. I’m really excited about these.

Heresy Sons

Heresy Era Thousands Sons Army

Sons army by Modian7th

Trying to wrap up his army for Nova, Modian7th has been knocking out the last of his Heresy era Thousand Sons marines. It is an incredible looking army and hopefully burning plenty of unworthy foes into ash.

Don’t Mess with this Pumpkin

Jack Scarecrow Dungeon Ninja Explorer

Jack Scarecrow by Scott

For something a bit different, Scott, The Brush Wizard, painted up Jack from Ninja Division, complete with custom sculpted pumpkin field. Scott will be judging the Golden Kobold at GenCon if you want to stop by the Ninja booth and say hi.

Adding Some Magic

Human Wizard with OSL Magic effect

Wizard by Dave G

Dave wanted to paint a wizard for his RPG adventures. Using a Privateer Press mini, he added a ton of OSL for magical effects. I especially like the effect of pulling energy out of the spell book, added with some gel medium.